|
|
|
Reading the Wind
Tips for Highpower, Service Rifle, and Long Range Shooting

 Staff Sgt. Emil Praslick III, is the primary coach for the USAMU (United States Army Marksmanship Unit) Service Rifle Team. Emil is also the wind coach for the U.S.A. F-Class team, and he has coached the U.S. Palma Team. An expert long-range shooter himself, Emil is widely considered to be one of the most knowledgeable wind coaches in North America. Staff Sgt. Emil Praslick III, is the primary coach for the USAMU (United States Army Marksmanship Unit) Service Rifle Team. Emil is also the wind coach for the U.S.A. F-Class team, and he has coached the U.S. Palma Team. An expert long-range shooter himself, Emil is widely considered to be one of the most knowledgeable wind coaches in North America.
In this article, Emil focuses on two Service Rifle courses of fire: 1) Rapid fire at 200/300 yards, and
2) Slow Fire at 600 yards. However, the insights Emil provides are not just limited to the Service Rifle or Highpower disciplines, nor are his wind-reading strategies limited to distances of 600 yards or less. Every competitive shooter can benefit from Emil's observations, whether you are shooting at 200 yards, 300m, 600 yards, or even 1000 yards.
This article originally appeared in The First Shot, the ODCMP online magazine, in two segments. The full article is reprinted here with permission from the ODCMP and the USAMU. |
Reading the Wind
(Part 1, Rapid Fire at 200 and 300 Yards)
 The term, “Reading the Wind” is misleading. A more apt title might be “The tactical negotiation of varying wind conditions and the limitation of their negative effects on the flight of your bullet.” In this article we will discuss some tactics and techniques that will enhance your abilities to negotiate the wind and (hopefully) add a few points to your score. This article will be divided into two sections: Part One will cover the 200- and 300-yard stages. Part Two will be devoted to the 600-yard stage. The term, “Reading the Wind” is misleading. A more apt title might be “The tactical negotiation of varying wind conditions and the limitation of their negative effects on the flight of your bullet.” In this article we will discuss some tactics and techniques that will enhance your abilities to negotiate the wind and (hopefully) add a few points to your score. This article will be divided into two sections: Part One will cover the 200- and 300-yard stages. Part Two will be devoted to the 600-yard stage.
There are as many dimensions to “wind reading” as there are stages to High Power competition. Your tactical mindset, or philosophy, must be different for the 200- and 300-yard rapid-fire stages than it would be for the 600-yard slow-fire. In the slow-fire stages you have the ability to adjust windage from shot to shot, utilizing the location of the previous shot as an indicator. Additionally, a change to the existing conditions can be identified and adjusted for prior to shooting the next shot.
During a rapid-fire string you will be afforded, in optimum conditions, two chances to make a correction prior to or during firing: one before commencing the string, and one during the magazine change. This requires a different approach to analyzing the wind condition than slow fire shooting. In the following section I will cover some of the basics, and attempt to describe the approach I use, both as a coach and shooter, to centering a rapid-fire group.
Once you have moved your equipment to the ready line, begin to observe the conditions. Do not wait until the command, “All ready on the firing line!” to make a decision about the wind.
Assess the direction, value, and the speed of the wind. There are a myriad of wind charts and formulas available to determine the amount of windage required to offset the wind’s effect on the flight of your bullet. Your best estimate should be checked against that of your fellow competitors. One of your best tools is the knowledge (and the results on the target) of your peers.

An often neglected and misunderstood tool is the use of range/wind flags. Immediately prior to assuming the sitting or prone position (while standing) you will not be able to use your spotting scope to check the mirage; you will, however, be able to see the wind flags. It is important to correlate what you can see in the mirage with the behavior of the flags. Alternate between looking at the mirage of a known condition, and observing the flags. Concentrate on the details. Pay close attention to the very end, or tip of the flag. A subtle increase in the speed of the wind will not change the height and angle of the flag, but it will affect action at the tip.
 1. Once you have identified a condition, both in the mirage and flags, observe its duration. Because you must fire the majority of your string without making a wind change, you must know what might result from any variance to the predominant condition. This is what we call determining a bracket. 1. Once you have identified a condition, both in the mirage and flags, observe its duration. Because you must fire the majority of your string without making a wind change, you must know what might result from any variance to the predominant condition. This is what we call determining a bracket.
2. Sighters, when available, should be used to determine the bracket of the wind condition. One technique is to stagger the interval of your sighting shots: fire your first shot as you would normally, and then wait until the conditions change-or just prior to the expiration of time to fire your second sighter. This will aid you in identifying the condition closest to your actual string of fire.
If there is the likelihood of a change to the condition, the windage you place on the rifle might need to be a compromise between a perfectly centered group and the damage a change might cause. One technique that experienced shooters employ in a changing condition is to identify the “safe side” of the 10-ring. For example, if the observed condition is one minute of wind from the right, gusting to two minutes, a savvy competitor might center his group on the right side of the X/10 Ring. In the event of a pick up, the wind gust would simply move the group to the center of the target or to the other side of the 10-ring. Obviously, the effectiveness of this technique is determined by your ability to shoot a small group. This should be an incentive to train!
The width of the 10-Ring in highpower rifle is two minutes of angle. Theoretically, a wind estimate within one minute of the correct value should result in a “clean.” In practice, the quality of the estimate must be much higher. An individual’s ability to maintain sight alignment, sight picture, and a steady position (along with the accuracy of the rifle) will determine the amount of error available to you in your wind estimate. Once again, this fact alone should be a powerful incentive to train!
 The risk of making a windage correction during the magazine change often outweighs the benefits, especially with beginning shooters. A good performance and the ability to shoot a tight group is the origin of the shooter axiom: “A good hold is worth a minute.” As a rule, unless you can clearly see your group outside the 10-Ring in your spotting scope, do not adjust your sights during the magazine change. There have been many disasters wrought from a shooter mistaking a paster; tear in the paper, or insect for a bullet hole. The risk of making a windage correction during the magazine change often outweighs the benefits, especially with beginning shooters. A good performance and the ability to shoot a tight group is the origin of the shooter axiom: “A good hold is worth a minute.” As a rule, unless you can clearly see your group outside the 10-Ring in your spotting scope, do not adjust your sights during the magazine change. There have been many disasters wrought from a shooter mistaking a paster; tear in the paper, or insect for a bullet hole.
Finally, although wind reading is an important shooter skill, your ability to master the fundamentals is the most important factor in shooting high scores. By trusting in your ability, talking to your fellow shooters, and concentrating on your performance, your scores will improve. In the next installment, we will discuss the different techniques required to read the wind during the slow fire stages of the National Match Course.
Reading the Wind
(Part 2, 600-Yard Firing)
In Part One of this article, we discussed the tactics and strategy needed to negotiate the wind during rapid fire (primarily 300 yards). The goal during rapid fire is to center your group in the 10 and X-ring. Your windage setting must therefore be a compromise between what the wind is doing at the beginning of firing time and what you believe it will be at the end of firing time. The 600-yard slow-fire stage needs a slightly different approach and skill set to maximize one’s performance. The ability to “read” the conditions, coupled with feedback from your last shot, make this stage one of the most intellectually challenging in highpower competition.
The basics of reading the wind still apply at the 600-yard line. Shortly after arriving at the ready line, you should determine the speed, direction and value of the wind. The first task, determining wind speed, has seen competitors arrive at the firing line toting the latest in meteorological marvels. I submit that the human eye and well-trained powers of observation are the equal of any overpriced anemometer (a fancy word for a “wind meter”). The following list of the effects of the wind and their corresponding velocity can be found in the 1931 Service Rifle Pamphlet produced by the US Army Infantry Team. The information is as relevant now as it was then.
 0-3 mph: Wind hardly felt, but smoke drifts 0-3 mph: Wind hardly felt, but smoke drifts
3-5 mph: Wind felt lightly on the face
5-8 mph: Leaves are kept in constant movement
8-12 mph: Raises dust and loose paper
12-15 mph: Causes small trees to sway |
The direction must next be determined. Flags are a useful utility in determining wind direction and value. When discussing the wind, we use the “clock system”. The direction of fire is always “12 o’clock”. The picture below illustrates the direction of the wind and its Value relative to your direction of fire.
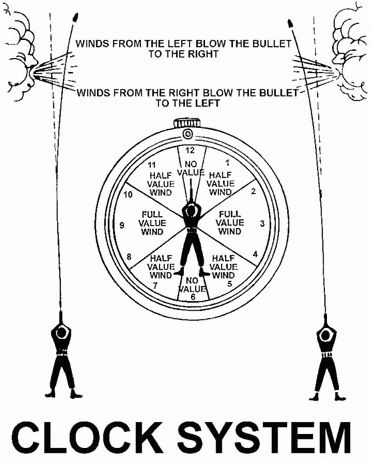 The Value of the wind is as important as its speed when deciding the proper windage to place on the rifle. A 10 MPH wind from “12 o-clock” has No Value, hence it will not effect the flight of the bullet (in terms of moving it left or right). [Editor's Note: Headwinds and tailwinds can, nonetheless, shift the vertical Point of Impact at long range.] A 10 MPH wind from “3 o’clock”, however, would be classified as Full Value. Failure to correct for a Full Value wind will surely result in a less than desirable result. The Value of the wind is as important as its speed when deciding the proper windage to place on the rifle. A 10 MPH wind from “12 o-clock” has No Value, hence it will not effect the flight of the bullet (in terms of moving it left or right). [Editor's Note: Headwinds and tailwinds can, nonetheless, shift the vertical Point of Impact at long range.] A 10 MPH wind from “3 o’clock”, however, would be classified as Full Value. Failure to correct for a Full Value wind will surely result in a less than desirable result.
The first question you must ask yourself is, “how much is the wind worth?” The effect of the wind on your bullet is a result of a combination of factors, such as: the caliber and weight of the bullet, its ballistic efficiency and the time of flight. I recommend the following, simple method. This method relies on know-ing how much the wind will move the strike of your round at 600 yards, given a velocity of 1 MPH, at Full Value.
For example, a 1 MPH Full Value wind will move AMU’s 600-yard ammunition approximately 3 inches at 600 yards. At 600 yards, 3 inches equates to ½ Minute of Angle (MOA). We will refer to this as our 1 MPH Constant. If you know the wind’s speed and Value, your initial estimate will be both quick and accurate. Furthermore, if the condition changes while you are shooting, you will be able to formulate a correction without stopping to consult your ballistic program and portable abacus.
Let’s go through this example. As you approach the firing line, the flags are blowing from left to right, indicating a left wind. The wind is a Full Value wind from “9 o’clock.” You estimate the speed at 8 MPH. Our 1 MPH Constant is ½ MOA. Multiplying 8 times ½, gives us a wind correction of 4 MOA. If the wind were Half Value, our correction would be 2 MOA.
An initial wind correction is only that, what the correction is at the start of firing. During the 20 minutes allotted to firing the 600-yard stage of the National Match Course, conditions can vary greatly. Keep the following factors in mind when analyzing the conditions and formulating your strategy.
1. The Importance of a No-Wind Zero. This is the sight setting required to hit the center of the target in a “no-wind” condition. This zero is best determined at close range, on a calm day.
2. Determination of the predominant condition. Wind will usually manifest a predominant condition with some variations. This condition and its strength (remember the 1 MPH Constant) are best observed prior to firing.
3. The value of the strength of the extremes. When wind is switching direction during a string of fire, the strength of the extremes must be known. Again, this is best determined prior to firing.
4. Distinguish the indicators available to you. Identify the upwind and downwind side of the range. The upwind flags are more important during firing, especially when attempting to discover an imminent change.
 5. Determine the accuracy of the mirage. Mirage is the reflection of light through layers of air that have different temperatures than the ground. These layers are blown by the wind and can be monitored to detect wind direction and speed. 5. Determine the accuracy of the mirage. Mirage is the reflection of light through layers of air that have different temperatures than the ground. These layers are blown by the wind and can be monitored to detect wind direction and speed.
6. Focus your scope midway between yourself and the target, this will make mirage appear more prominent. I must emphasize the importance of experience when using mirage as a wind-reading tool. The best way to become proficient in the use of mirage is to correlate its appearance to a known condition. Using this as a baseline, changes in mirage can be equated to changes in the value of the wind. Above all, you must practice this skill!
7. Always know, with absolute certainty, how much wind adjustment you have on the rifle. If there is a pick-up in the velocity of the wind, attempt to think of its new value in Minutes, not with the mindset “that it’s a minute more than the last shot.” This will allow you to think of the wind condition in terms of its actual strength in Minutes of Angle. Critical thinking will result in a rapid improvement in your ability to read the wind.
The last piece of advice has more to do with sportsmanship than the technical skills of wind reading. You must maintain your composure and sense of humor at all times. Learn from your mistakes, and those of others. Your attitude on the firing line is directly proportionate to your ability to react positively to adversity.
Good luck and good shooting!
| The USAMU Service Rifle Team fields questions pertaining to a variety of Service Rifle Shooting topics such as Equipment and Ammunition, Shooting Positions and Shooting Techniques and Tactics. Go to the USAMU Shooting Tips Page to view the latest questions and answers. You can also email questions to USAMU[at]odcmp.com. |
This article brought to you courtesy of the Civilian Marksmanship Program.

© 2007 Civilian Marksmanship Program, USAMU, and SSG Emil Praslick III, All Rights Reserved.


|
|

