|
UltraSonic Case Cleaning
High-Tech Way to Clean Fired Cases INSIDE and Out
 Ultrasonic Cartridge Case Cleaning Made Easy Ultrasonic Cartridge Case Cleaning Made Easy
by Jason Baney
Many things in my reloading routine changed after becoming involved with 1000-yard Benchrest. Before long I decided to give up tumbling with standard corn cob and walnut media due to some bad experiences with buildup in the cases. I had even tried rice as a tumbling medium, and it works great, but will also leave a nasty residue after a while. With all the media I used, I was also not happy with the dust that was left over. I didn’t particularly care to see if this dust or buildup would cause me problems, so it was just easier to stop tumbling all together. This may not have helped quantitatively, but mentally it was a step in the right direction. (Click HERE to ZOOM Photo.)
Instead, I resorted to cleaning up the outside of the necks with Krazy Kloth or some fine steel wool, or even some Kaboom liquid cleaner on a paper towel. For the inside, I would chuck a worn bronze bore brush in a cordless drill. Lastly, I scraped the primer pocket with a Lee primer pocket cleaner. All this work still left the interior of the case packed with carbon residue. This residue liked to fall out in large flakes during sizing and priming, and was a little disconcerting. Well, all that has changed, and now I save a lot of time and repetitive case handling, and end up with impressively clean cartridge cases.
Up until a few months ago, I never gave a second thought to using an ultrasonic cleaner to clean cases. But after seeing several posts on various shooting forums, I got curious and had to try one for myself. It took me a while to find the right procedure and the best "cocktail" of cleaners, but the end result was great. I've concluded that, if you're fussy about your brass, ultrasonic cleaning is well worth the effort.
 
 Getting the Machine--Ebay Comes Through Getting the Machine--Ebay Comes Through
After waiting for several months with a backorder at Harbor Freight,
I decided to peruse eBay and see what was available. I’m not sure why this idea didn’t come to me earlier. To my surprise, there were many affordable, small to mid-sized units available. Since I don’t process mass quantities of brass at one time, I went for a very affordable unit. The unit had timer settings of 90/180/280/380/480 seconds, a 2.4 pint capacity, and ran at 42,000 Hz just like the unit from Harbor Freight. The "Buy it Now" cost delivered to my door was $75, but if you are patient and wait out a few auctions, you can get the same unit for much less!
Initial Testing--Simple Green Fails to Impress
The first thing I decided to clean was a 223 suppressor. I filled it with straight Simple Green, plugged the ends with disposable ear plugs, and gave it several maximum 480 second cycles. Following that I ran several distilled water only cycles until the water came out clear. It was fairly clean in the end, but I was a little disappointed at how much visible carbon was left on the suppressor. I expected Simple Green to work better…
Assembling Test Candidates
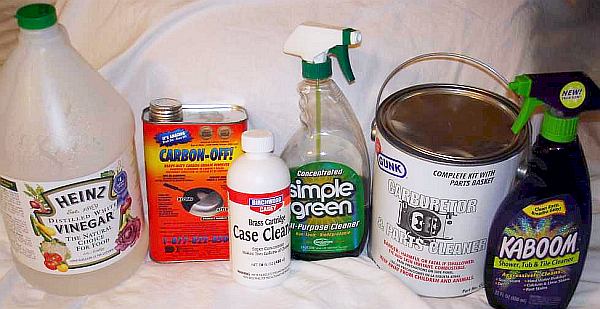
Now it was on to brass and the testing that would show me if the $75 dollar investment was worthwhile. I assembled several reasonably priced solutions that were talked about over the internet and began my plan of attack to get good information with the least time and supplies wasted. The solutions I gathered were: Simple Green, Kaboom, household White Vinegar, Carbon-Off, Birchwood Casey Brass Cartridge Case Cleaner, and GUNK Carburetor and Parts Cleaner.
Plan in Action--Beakers Speed Clean-Up
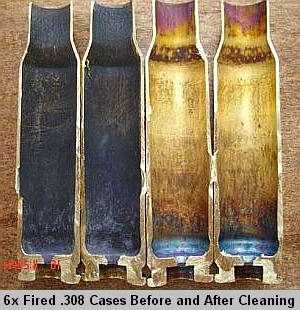
 My brass test subjects were 6-times-fired .308 Lapua brass that had never been tumbled, and was on the verge of head separation. For a little variety, I also ran some dirty 17 Rem and .243 Win cases that were sent to me by a few forum members for this project. I decided to only use a couple cases in each run, as that was all that was needed to tell me if the procedure would work or not. I also segregated the different solutions in beakers within the water filled tank. This allowed me to test several solutions at once without dumping and cleaning the entire tank in between runs. My brass test subjects were 6-times-fired .308 Lapua brass that had never been tumbled, and was on the verge of head separation. For a little variety, I also ran some dirty 17 Rem and .243 Win cases that were sent to me by a few forum members for this project. I decided to only use a couple cases in each run, as that was all that was needed to tell me if the procedure would work or not. I also segregated the different solutions in beakers within the water filled tank. This allowed me to test several solutions at once without dumping and cleaning the entire tank in between runs.
Before you ask, NO, the glass beaker doesn’t stop the ultrasonic action from penetrating to the casings inside. All cases were deprimed with a universal decapping die for optimal cleaning of all surfaces. At right are the .243 cases in the beaker waiting for solution to be added.
Testing Various Solutions--The Search for the Ideal Chemical Cocktail
First up was the Kaboom, as this was similar to CLR and has been used by several people I know (as well as myself) to clean cases manually. I did a couple runs with dilutions of Kaboom (1:8 and 1:20). After two 480-second cycles (16 minutes), the cases were very clean and shiny so I finished with a rinse cycle and dried them. The brass looked great as soon as it came out of the water. Devoid of any carbon deposits inside and out, the cases were shiny as new. Well in the morning the cases were varying shades of purple and other colors as the Kaboom had done something strange to the brass. I worried about what the chemicals might be doing to the brass, so the Kaboom was eliminated from further testing. I should have abided by the warning on the bottle to not use it on brass.
Next up was the GUNK parts cleaner. My best run with GUNK resulted in brass that was still dull, but somewhat clean. The color remained unchanged, and the inside of the case was about 70% clean, with the primer pockets being totally clean. The remaining carbon was concentrated on the inside of the case head more than the walls or neck. The harsh solvent smell and attributes made me less interested in this using this, so it too was moved to the back burner.
The most expensive cleaner, Carbon-Off, was next at bat. Carbon-off from Discovery Products costs about $22 per quart delivered, and is hard to obtain. Though this seemed like the perfect answer to my question, it was in fact the worst of the bunch! Smell was worse than the GUNK, and on top of that it was a gel and could not be diluted! Running it through the same cycle as the GUNK basically just shined up the case a bit. 95% of the carbon was still there. So Carbon-off was added to the junk pile.
Many people recommend Simple Green for carbon removal, so since I already had some, I threw it in the test as well. A 25% solution did almost nothing for the carbon, so in an effort to expedite the evaluation, I went straight to 100%. The simple green still did almost nothing to clean the inside of the cases! On top of that, in the morning, the cases looked like they had been buried underground for a few years--very dark and irregular-colored. Simple Green, by itself, was no good either.
Next I tested the only specific commercial entry, Birchwood Casey Brass Cartridge Case Cleaner (BC). This was chosen as the only commercial entry because it was the most economical. The directions recommended a three-minute soak time with agitation. If three minutes was good, eight minutes was better right? The solution was diluted as prescribed on the container and one eight-minute cycle was run followed by a hot water and distilled water rinse. Well, the cases looked beautiful on the outside (brighter than new actually), but they were still very dirty inside as well as around the neck. Since I had already exceeded the recommended soak time by almost 300%, and the cases still weren’t clean enough, the Birchwood Casey cleaner was set aside as well.

  Old-Fashioned White Vinegar (with Soap) Works the Best Old-Fashioned White Vinegar (with Soap) Works the Best
Now we get to the good stuff. I was desperately hoping vinegar would prove useful and justify the time and money spent on this project. It was now down to the least expensive solution I had. Dish soap had also been mentioned in the forums, so I decided to incorporate it as well. My first trial used full strength vinegar with a drop of soap, and a cycle similar to the others. This showed promise, giving a perfectly clean case, but turned the cases a dark patina once again. I also tried a 50% solution of vinegar and it gave the same results, so there was no need to use it full strength. Fifty percent white vinegar was the best solution yet, so I decided to stick with it and tweak it for the best and fastest results.
The Mad Chemist Needs A Neutralizing Agent
At this point the brass was coming out with no carbon deposits whatsoever, but I wasn’t happy with the darkening of the brass so I figured a neutralization step was needed after the vinegar to stop the acid’s reaction. A water rinse was fine with the acidic BC case cleaner, but not sufficient with vinegar. Baking soda (BS) seemed like the easiest and most readily available option to neutralize the reaction. The BS was simply dissolved in water in the proportion shown below. I went through nearly a dozen runs to come up with the best combination of vinegar, dish soap and baking soda.
ULTRASONIC CLEANING — Baney's Best Recipes
My ultimate solution resulted in shiny brass that was 100% devoid of carbon, inside and out. Even the carbon deposits on the neck and the primer pockets were completely removed! My objective had been accomplished! Dirty old black brass came out like new inside and out…I was amazed. Not only did my protocol work well, but it was the least expensive option in the whole test! For "Cheap and Clean," this is the procedure I settled on:
CHEAP and CLEAN
24 minutes - 50% Vinegar + 1 Drop Dish Soap per 8 ounces water
480 seconds - Baking Soda (BS) in water (1 grain BS per ounce of water)
480 seconds - Hot Water
480 seconds - Distilled Water
Total: 48 minutes
Cost: Less than $2.00 per gallon
And for a Super Shiny and FASTER End Result, Add BC Solution
Since the BC solution had worked so well to shine up the cases earlier, I attempted to work it in with the vinegar procedure to streamline it even more and give even better looking brass. So for a couple dollars more, you can have 100% clean cases, which are even shinier than the "Cheap and Clean" procedure above. So this procedure I'll call "Clean and Shiny."

CLEAN and SHINY
24 minutes - 50% Vinegar + 1 Drop Dish Soap per 8 ounces water
380 seconds - Birchwood Casey (BC) Case Cleaner
380 seconds - Hot Water
380 seconds - Distilled Water
Total: 43 minutes
Cost: $2.00 per gallon for the Vinegar and $4.00 per gallon for BC Cleaner.
This "Clean and Shiny" procedure gave me the best combination of carbon removal, case luster, speed, and economy. The "Clean and Shiny" regimen also eliminates the neutralization step, as the BC cleaner acts as a neutralizer. Even though it contains a few acids, they must rinse off more readily than vinegar. Regular household vinegar is 5% acetic acid (2.5% when diluted) and the BC cleaner contains 3 different acids, one of which is phosphoric (the same found in pepsi). It starts at over 50% acid as a concentrate, and a little over 3% when diluted.
 |
Case Care Following Ultrasonic Cleaning
After removing the cases from the final distilled water rinse, I simply blow them out with compressed air and lay them on a paper towel to dry overnight. A hair dryer works well too, especially if you get the air in the case mouth. In the morning you have clean, shiny dry brass ready to size. If you have no air compressor, simply whip them around by hand a few times to force any water drops out of the case mouth. Then lay them on a paper towel to dry overnight.
 CONCLUSION--It Was Well Worth the Effort CONCLUSION--It Was Well Worth the Effort
Though I wasted some money on solutions that performed poorly, I am happy with the results so it was worth it. I never thought I would be able to make dirty, fired brass look like new again!
I've now processed many 308s and some 8X 6.5-284 cases using the "Cheap and Clean" process, and I’m very satisfied with the fact that I can almost see my reflection inside the case! Believe it or not, there was no physical work involved in cleaning the cases, just the right solutions and a bit of time in the Ultrasonic. So, quit wasting your time with vibratory tumblers or manual labor and try my protocol with an ultrasonic unit of your choice.
WARNING: The unit makes a noise that is not real friendly to your ears, so make sure to run it in a place that wont annoy the others in your household. It isn’t loud, just annoying--but no more annoying that a running tumbler!
| Ultrasonic Cleaning--How to Get the Best Results
Reader "Gunamonth" has a great deal of experience with ultrasonic cleaning methods, perfecting his skills on small 17-caliber cases that are very difficult to clean with conventional brushing or tumbling. Here are his tips for getting better, faster results from your ultrasonic cleaning sessions.
Gunamonth's Ultrasonic Cleaning Tips
I thought it might be helpful to understand some of the principles involved and maybe how to stay out of trouble. I've noted that some members have observed that their brass comes out "too clean" or has a rough surface when finished. Here are some ways to avoid those potential problems
The Chemistry
Both metals used in brass cases (copper and zinc) are soluble in acetic acid (vinegar). The salts, copper acetate and zinc acetate, are also soluble. Zinc is more soluble than copper so it dissolves faster. In addition a galvanic action occurs that cause copper to be dissolved and then redeposited on the surface at the expense of the zinc.
When you clean brass cases in a vinegar solution you change both the chemical and physical properties of the surface of the case. There have been comments about cases being too clean, primers hard to seat, deposits on mandrels, etc. When you change the surface by dissolving some of it and etching it these things will happen. Whether they happen to the point of being a problem becomes the issue.
This doesn't mean that you shouldn't use acetic acid or that there is anything wrong with Jason's approach. Anything used to clean brass chemically is going to have some effect on the surface and it sure beats trying to get residue out of the flash hole of a 17 Remington with a brush.
Beaker Selection
I suggest you use one beaker and make it the largest you can fit in your ultrasonic unit. This gives more surface area for the tank water to work on and reduces the attenuation the beaker causes. Also, if you're in the market for beakers look for Kimax brand rather than Pyrex. Kimax is about 30% thinner and attenuates the ultrasound less.
How to Achieve Better Results
To minimize the effect on the brass there are some things you can do, most of which attempt to reduce the amount of time the cases spend in the acetic acid:
1. Keep the cleaning solution cool. In other words don't use hot water to mix up the vinegar solution. My ultrasonic tank is in the garage which isn't air conditioned so when I use it in the summer I empty the tank and fill it with cold water.
2. Clean a rather small number of cases at a time. I do about fifteen 17 Remingtons at a time. They're as clean as they're gonna' get in less than four minutes. I've tried as many as 100 at a time and it takes a very long time. Brass is pretty good at absorbing ultrasonic energy and too many cases translates to too little energy per case to clean quickly.
3. Keep the cleaning system "tuned". The unit I have has a tank that is about 5X10X5 inches. I cut a piece of Plexiglas to cover it and cut a hole the size of a 600ml beaker with a fly cutter. I made a collar for the beaker out of plastic foam that fits very snugly so the beaker can be raised or lowered. By adjusting the level of water in the tank, liquid in the beaker and depth of the beaker in the water it can be "tuned" so that the liquid in the beaker appears to boil while the water in the tank is calm. It only takes a few minutes and has a major effect on how long it takes to get them clean.
4. Don't let the beaker touch the any part of the tank, especially the bottom where the transducer is. The idea is to cause the brass to oscillate, not the container. |
Do You Enjoy Reading This Article? Please Consider Making a Small, Secure Donation:
Copyright © 2007, 6mmBR.com and AccurateShooter.com, All Rights Reserved. Brass and cleaning photos by Jason Baney, All Rights Reserved, used by permission. No reproduction of any content without advanced approval in writing.

|

