|
|
|
Neck-Turning with Lathe or Mill
Mike Bryant and Dan Lilja Describe Powered Case Neck Solutions
EDITOR'S NOTE: The most accurate rifles on earth are short-range Benchrest guns, primarily chambered in 6 PPC. Almost without exception the best "point-blank" shooters use neck-turned brass. Neck-turning helps minimize run-out while making neck tension much more consistent case to case.
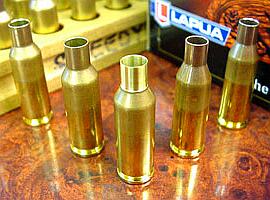 While the classic 6 PPC neck was turned to about .010" neckwall thickness, for a .262/.263 neck, today, many shooters are successfully running much thicker necks. You'll find .265s, .266s, and even a few .268s. So long as you do a "full clean-up" on the neck, you can benefit from neck-turning, whether you have a .262 neck or a .268. Either way though, you're going to have to remove brass from the necks. This can either be done by hand, or it can be done on a lathe. The lathe offers higher output, and when set up properly, very few hand turners can match the case-to-case consistency of lathe-turned brass. While the classic 6 PPC neck was turned to about .010" neckwall thickness, for a .262/.263 neck, today, many shooters are successfully running much thicker necks. You'll find .265s, .266s, and even a few .268s. So long as you do a "full clean-up" on the neck, you can benefit from neck-turning, whether you have a .262 neck or a .268. Either way though, you're going to have to remove brass from the necks. This can either be done by hand, or it can be done on a lathe. The lathe offers higher output, and when set up properly, very few hand turners can match the case-to-case consistency of lathe-turned brass.
In this article, noted gunsmith and Benchrest shooter Mike Bryant explains how he turns Lapua 220 Russian necks on his lathe at Bryant Custom. The procedures Mike describes can be applied to any neck-turning operation, so long as the set-up is correct and the turning mandrel is properly fitted to the caliber.
For those that have a milling Machine, barrel-maker Dan Lilja explains how to turn 6 PPC necks using a vertical mill. In many respects this is easier than using a lathe. Again, the process Dan describes can be used for cases of other calibers, so long as you have appropriate mandrels and tools.
Brass photo courtesy Speedy Gonzalez. | 
Lathe-Powered Case Neck-Turning by Mike Bryant
Below are photos of a method of neck turning brass if you happen to own a good lathe. Using a lathe can be a great time saver, once you have everything set-up right. It takes me about two hours to neck-turn 100 cases, and that includes time checking wall-thickness with a ball mic along the way.
This same topic is covered in greater detail in Jackie Schmidt's article, "Single Point Turning of Case Necks in the Lathe", orignally published in the NBRSA News, and republished online.
Creating a Turning Mandrel from Drill Rod
The first step is to set up a piece of .375" drill rod in a three-jaw chuck. Turn this down until you get a short section with the diameter that you want to use for your mandrel. In my case, I have turned it for a .2430 diameter as I am neck-turning brass for a 6 PPC. You will need to use a high speed steel or cobalt tool in order to make the mandrel. Carbide won't work as well as it deflects slightly.
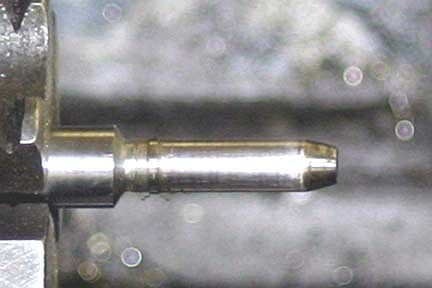
When you have it turned almost to the diameter that you want, file a taper on the end of the mandrel. Then polish the last few ten thousandths off with 600 grit sandpaper until the mandrel mikes .2430 using a 1" micrometer. Check the runout of the mandrel with a .0001" test indicator. The mandrel should have zero runout after you have it machined. If it doesn't have zero runout, you want to start over and re-machine a mandrel until it does. If you can't obtain zero runout, then you don't want to neck turn on your lathe as the headstock bearings may not be good enough to do it. Your mandrel should look similar to the photo below.
Arranging the Case
The second image (below) shows the set-up to turn necks. I use a .308 shellholder to push the .220 Russian case onto the mandrel. The shellholder is held with an extra ram that I had from an RCBS RockChucker press with the end turned down to fit in a drill chuck. The case can be pushed on without prior expanding up to 6mm or can be expanded up prior to neck turning in a separate step as long as the newly-turned mandrel will hold the neck tight while turning.
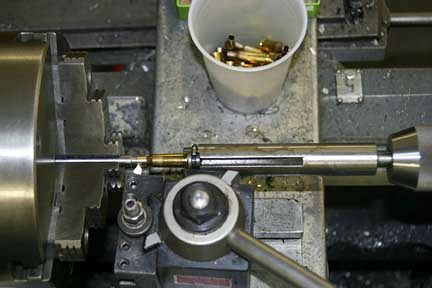
You push the case onto the mandrel with the .308 shellholder. The .308 shellholder fits loose enough that you can remove pressure from the tailstock and let the case spin with the lathe without having to remove it from the shellholder. With the carriage feed make a quick pass to the neck/shoulder junction of the case. Then engage the carriage power feed feeding towards the headstock.
Setting the Cutting Tool Position (Cutting Depth Control)
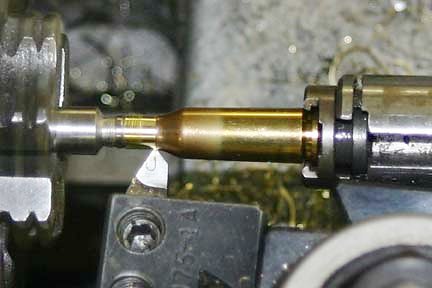
Check the neck diameter with a 1" micrometer and make adjustments to the depth of the cutting tool with the carriage until the turned neck still on the mandrel mikes the diameter that you want on the outside of the neck. In my case, I am turning to a .2600" neck diameter to fit in a .262 neck diameter. When you reach the diameter that you want, lock the crossfeed and compound so that they will not move, and recheck your dimensions with another case. Once you reach the dimensions that you want with everything locked, you are ready to neck turn all the cases that you intend to do.
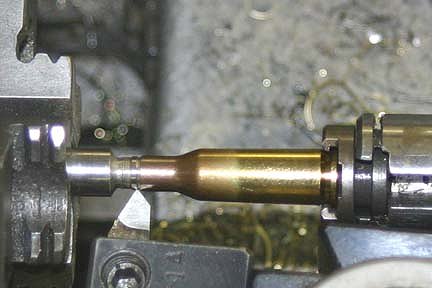
In the photo above, you can see case before neck-turning showing the geometry of the tool used to turn the neck.
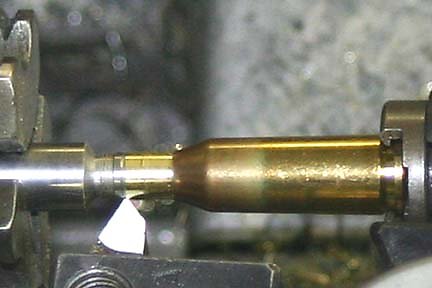
Controlling the Length of Cut
Above is a photo showing the tool after moving the carriage to the neck/shoulder junction. Notice that the cut is pretty rough at the front of the neck and as the carriage has slowed down as I was closer to the shoulder, the cut is smoother. This doesn't make any difference as the main cut is applied with power feed as soon as the cutting tool reaches the neck-shoulder junction.
Below is a photo showing the final-finish turned neck still on the mandrel:
To complete the job, turn the tailstock out, removing the case from the mandrel. Note--As you work on your cases, check the neck wall thickness periodically with a ball mic to make sure that it is what you want (and that your cutter tip is holding its depth setting). | 
Turning Cases with a Vertical Mill
by Dan Lilja, Lilja Precision Rifle Barrels
6 PPC Neck Turning
Like most benchrest shooters I don't like to spend a lot of time preparing 6 PPC cases for match shooting. I'd rather be shooting groups with the cases than working on a new batch of brass.
But the job isn't near so time consuming as it once was for me. When I started shooting in registered benchrest matches in 1976, I purchased a neck-turning tool made by Paul Marquardt. Paul is gone now, but I still have and use the neat little tool that he developed. In those days we held the case in a little clothespin type clamp which was then held in a vise. The Wingnut type turning tool was rotated by hand and the brass flowed off of the neck with each twist of the tool. It was a long and hand-tiring process. But it worked.
| I think the quality and consistency of the turned necks is better than when I did them by hand. The high speed, uninterrupted turning, along with the cutting fluid, produces a very nice finish. |
Over time, I wanted a more efficient solution than turning by hand. Currently, I use a milling machine to turn case necks. This is not just for the PPC-size cases either--I've done the same with 50 BMG brass. It so happens that a PPC case will slip into a 7/16" diameter collet just right and I use the milling machine spindle to turn the brass. The neck-turning tool is held in the vise. The trick is to be sure the tool is held squarely in the vise and that the collet is centered directly over the tool mandrel. With other case diameters that don't fit neatly into a standard diameter collet, I use a Jacobs 3-jaw chuck to hold the case.

Shown above is a Nielson "Pumpkin" Neck-Turning Tool.
The machine I use has a variable-speed spindle drive and I wondered at first if the low RPM range of the direct drive, 500 RPM, would be too fast. It proved not to be though and with the application of a little tap cutting fluid, like Cool Tool, a very nice, uniform cut is made on the case neck in just a few seconds. This particular machine also has an air-activated collet-closer and so the whole operation is very quick. I recently turned fifty 6 PPC cases in 30 minutes or so.
My 6 PPC reamer has a .261" diameter neck and I turn my necks to a thickness of .0085" per side. This leaves me about .001" clearence between a loaded round and the chamber. Some shooters like a closer fit but this diameter has worked well for me.
I think the quality and consistency of the turned necks is better than when I did them by hand. The high speed, uninterrupted turning, along with the cutting fluid, produces a very nice finish. Also, with the case centered directly over the mandrel, there is no side deflection of the case as there is when turning by hand. Every neck is the same size as the previous one. I spot check the neck thickness with a tube micrometer. Uniformity is one of the keys to shooting little groups. And little groups are what benchrest shooting is all about. |
Copyright © 2007 Mike Bryant, Dan Lilja, AccurateShooter.com | 6mmBR.com, All Rights Reserved

|
|

