Richard Franklin's Step-by-Step Guide to Pillar Bedding
The Art of Stock Beddingby Richard Franklin
Richard Franklin prepared this article for our readers. Richard tells us: "I'm happy to do pillar-bedding work, but this is a job which many shooters can do themselves, with some practice and the right components. I do suggest you practice first on an old 'beater stock'. When done right, you end up with a perfect fit of receiver to action, with no twisting, stretching, or compression forces being applied to the receiver through mis-alignment. That's what I mean by 'stress-free'."
This article covers all the steps in the process. If you want to see more, Richard has created a 200-minute DVD that shows the entire job--from start to finish--and contains many more tips to help you achieve perfect results. Richard shows how to properly relieve the bedding area, how to make pillars, how to set up the barreled action, and how to test your work to ensure it is truly "stress-free". In the DVD, Richard does a complete pillar bedding job on both a finished custom stock and a Remington stock. We've included a short sample from the video in Step Nine (Separating Stock from action) below. To order the DVD, go to the Instructional Video page on Richard's website, RichardsCustomRifles.com.
Before You Begin -- Some Comments About Inletting Richard told us: "You can't do a great bedding job unless you start with really good inletting. Unfortunately, many 'inletted stocks' really require quite a lot of work to get the inletting right. You cannot inlet a stock 100% correctly just using a stock duplicator. That's one reason I do bedding jobs only on the stocks I make. If the inletting isn't right, you can have a myriad of problems--such as the holes for the action bolts being in the wrong place, or the stock not having enough clearance for the barrel or the trigger hanger. So, BEFORE you start your bedding job, make sure the inletting is really right. Don't assume the inletting is really complete (and correct) just because the manufacturer claims that to be the case. This applies to both wood and fiberglass stocks."
Pillars For Bedding The BAT action featured in this article has three pillars, with the middle pillar sitting under the front of the trigger guard, and the third pillar at the rear of the guard. More typical installations will use two pillars. For either system, the installation procedures are the same.
In Photo 1, you will see part A, the bottom part of the front pillar which we call the "escutcheon". Part B, which is a 1/4" X 28 action bolt that is slightly longer than part C which is the top part of the front pillar. The two parts of the front pillar were machined as one piece and then the escutcheon was cut off just below the shoulder that is inside. This shoulder is for the head of the action bolt to tighten up against. I've found that a two-piece pillar has many advantages, particularly for hunting stocks where the underside of the stock is angled (i.e. not parallel with bore axis). I make the pillars I use, machining them from cut-off stainless barrel stubs.
Part D is a 1/4" X 28 hex-head bolt with the head turned down to 1/4" which permits the insertion of a hex-head driver to tighten and remove the bolt. This headless bolt will be inserted in the rear tang hole of the action and part E, the rear pillar will be placed on it.
STEP ONE--Getting Started Photo 2 shows tape on recoil lug, pillars bolted in place and putty in voids. Release agent is polished to a very thin layer. The top half of the front pillar (part C) is placed on the action receiver ring and the bolt (part B) is inserted thru the pillar and tightened against the action. This bolt must have a tapered head on the underside so that, when it is tightened, it will center the top half of the front pillar around the action bolt hole. (This is also true for the middle pillar if the action has a middle bolt.)
PHOTO 2
The headless bolt is inserted into the rear tang hole of the action and the rear pillar is slipped down on it. You will notice in Photo 3, below, that the pillars have the hole drilled oversize so that a 1/4" bolt has a little space around it. (I like to drill the pillars with a .260" bit inside)
The above scenario is the placement of the pillars prior to applying the bedding compound, which I call "Mud". Devcon 10110 is my bedding compound of choice (and the only product I use) as the mud must set up as hard as concrete and most other epoxies will not do this. Also Devcon shrinks very little if at all. My comments on other bedding compounds are in the sidebar below.
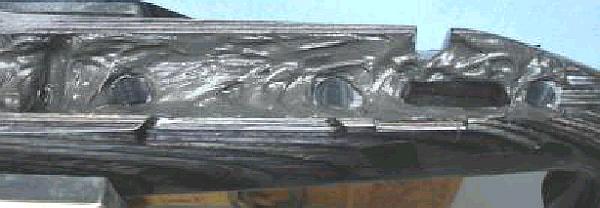
STEP TWO--Relieving the Stock Before Bedding Relieving the right amount of wood in the area to be bedded--not too much, not too little--is very important to achieving the best results. You need to create some space for the mud to fill around the action, but you don't want to alter the inletting too much.
PHOTO 3
Photo 3 shows the wood removed from the inside of the stock bedding area. Remove enough wood everywhere except along the top sides of the stock to allow at least 1/8" to 3/16th" of room for the mud. Remove 1/4" of wood behind the recoil lug. I like about .012" clearance on the top inside edges.
Leave a small area of original wood just behind the rear tang bolt hole as this wood will determine the elevation of the bedded action in the stock.
Photo 4 shows the tang area of the stock. Note the elevation wood left at tang. Be sure to leave some original wood for the action tang to sit on. This is very important.
STEP THREE--Wrapping Tape on the Barrel Photo 5 shows the barreled action in the vise. It also shows black electrical tape wrapped around the barrel just behind the front of the stock forearm. Wrap enough tape to hold the front of the barreled action at the proper elevation in the stock.
The idea is that the barreled action does not touch anything except the bit of original "elevation" wood left at the rear tang (behind the pillar) and the forearm resting on the electrical tape. This is very important to obtain 100% stress-free bedding. You want the bore of the barrel to be parallel with the top edge of the stock so wrap just the right amount of tape to ensure this. The tape also centers the barrel in the fore-arm. Done right, the barreled action will be contacting just at two points (tape in front, tang in rear) and the barrel's bore will be parallel with the top of the fore-arm's sidewalls.
Comments on Alternative Components and Methods
Bedding Compounds There are at least a dozen popular products used for rifle bedding. At one time or another, Richard has tried most of them. Devcon 10110 "Plastic Steel® Putty" is the only compound he currently uses and the only product he endorses whole-heartedly. "The Devcon 10110 is expensive, but it is the best bedding product I've found. First, it sets up extremely hard. That is very important to the performance and longevity of the bedding job. You want it to get it as hard as concrete. You need it really hard so when you tension the action screws it doesn't squish down or migrate. Some of the brown stuff other folks use is way too soft. Marine Tex is also too soft. Many products will shrink. Any compound that shrinks is useless in my book. Devcon has absolutely near-zero shrinkage. Acra-glass I keep in my shop, as it is useful for stock repairs. However I would never bed with Acra-Glass.
Devcon also has just the right consistency--about that of peanut butter. So, it is easy to apply but not runny. It stays in place when I turn the stock upside-down. Devcon is also relatively forgiving to mix--the proportions of the two elements are not super-critical like some other products. I know Marine-Tex can give real problems if you don't use just the right amount of catalyst. Overall, Devcon does everything you need it to do, and does it exceptionally well. Some other smiths think it's too expensive--and yes I'll use $10-$15 worth of Devcon in doing a typical bedding job. But I think the customer deserves the best possible, longest-lasting bedding, and that means Devcon. Among the products I've used, Bisonite is my second choice, but I think Devcon will last longer."
Release Compounds Richard tells us: "People use all sorts of release compounds and I've tried many. I strongly prefer Kiwi shoe polish (neutral color). With the Kiwi, I've never had an action stick in the stock. It goes on easy, and you can use a paper towel to polish it very thin and that's a big benefit. If you have a thin layer of release compound the finished bedding is that much closer to the exact dimensions of the action. I've heard of guys using PAM spray. I don't trust that stuff. The Brownells release compound goes on too thick. Car wax is not a great choice either because it can separate and it gets dusty as it dries. Go with the Kiwi stuff--a little can will last for years. But be sure to use the clear (neutral) kind so you don't stain your stock or action."
Clamping and Tension Materials Read a few articles on pillar bedding and you'll see many different systems for holding the barreled action to the stock when the bedding compound cures. We've seen surgical tubing used, or strips of bicycle inner tube. Some writers have even advocated using mechanical clamps (a bad idea). Richard has tried various tensioning set-ups over the years, and electrical tape is his strong recommendation: "First, let me say it's crazy to use a C-Clamp or something like that. The clamp will cause a point-load where it attaches and that is just the opposite of what you want."
Richard has tried many materials: "Surgical tubing I've found to be cumbersome to use, and it tends to loosen up during the curing time. Same thing with strips of inner tube. That's bad news because any loosening or stretching will allow the action to shift. It's absolutely critical that the action not move one bit while the bedding cures. Once you've bedded the action if it dries the wrong way you've screwed everything up. Using the electrical tape that isn't an issue. The tape goes on very tight, doesn't stretch (if you use enough turns) and I have no fears that the action will shift while curing. Just follow my advice and put a strip of paper towel under the electrical tape so you don't mar the finish of the barrel or stock."
Contoured vs. Straight (Flat-top) Pillars Many factory rifles come with contoured (radiused) pillars, and many gunsmiths prefer to use these. The idea is that the contour provides a better fit with the bottom of round actions. Richard has tried contoured pillars and doesn't recommend them. He explains: "Most of the contoured pillars don't really match the contour of the action anyway. And every action is slightly different. Even some of the most favored custom actions aren't exactly the same from one unit to another. What happens when the contour or curve of the pillar is too narrow is that the action touches just the extended top edges of the pillar (left and right of center). That is not as solid as when the action contacts the center of the pillar where the action screw runs. (And those sharp sides of curved pillars tend to point-load and dig into your action.) Also I feel you get a better match of the Devcon to the action with flat-top pillars. What you want is the bedding compound to cradle the action all the way around. I've found this works best with flat-top pillars and a very strong, hard compound like Devcon that doesn't squish down or shrink."
Avoiding Mechanical Lock During Bedding One major problem that can arise when novices bed their own stocks is mechanical lock. This occurs when some part of the action or barrel is trapped below the bedding. Effectively, the barreled action becomes anchored in the stock and can be very difficult to remove. Richard says avoiding mechanical lock is not that difficult, but you must be careful: "Locks usually occur because the bedding is applied too far up. Never, and I repeat, never, bed above the centerline of the action (bore axis), or the widest point of the action (whichever is lower). You need to leave the edge of the bedding at least 1/16" below the centerline of the action and centerline of the bore axis. I normally leave about 1/8th of vertical clearance. If the widest point of the action is BELOW the bore axis, you have to keep the bedding below that. The other thing to watch out for are projections and holes in the sides of the action. All holes must be filled with plumbers' putty. All projections--anything that sticks out--need to be removed. If some little part or fixture sticks out, even if you tape it over, and it is below the top of the bedding, it can lock the action in."
STEP FOUR--Applying Release Agent and Plumbers Putty Failure to apply release agent (and putty) properly is a recipe for disaster. One of the most common mistakes novices make when doing bedding jobs is locking in the action. This happens by not covering enough of the action with release agent, not taping off the lug correctly, and not adding putty to plug any slots or spaces into which the mud can migrate. Remember, you are doing a bedding job, not a glue-in job! When you've completed the process, you want to be able to pop the action loose without difficulty.
PHOTO 6 -- Showing putty and release agent before polishing, tape on lug.
First, remove the trigger, bolt release and spring, and anything else from the bottom of the action. Then, clean the action and recoil lug area with brake cleaner or parts degreaser. Apply plumbers' putty to any hole or crevice that you don't want the mud to get into. Wrap two layers of masking tape on the outside edges of the lug and trim with a razor blade. Do not apply tape to the front or back of the lug. (Apply tape to the front of the lug only if you do not have a way to remove the hardened mud). Let this tape go right around to the top of the action. Wipe the putty smooth with the brake parts cleaner. I highly recommend neutral Kiwi shoe polish as release agent. Apply liberally to the entire action using a Q-tip to get in around the lug (including front and rear of lug), bolt handle slot and loading port edges. Let the shoe polish dry for 10 minutes and then use a paper towel and buff and polish the release agent as thin as possible. You want any release agent to be as thin as possible so as to let the action set as close as possible to your bedding. You also want to apply release agent to the rear (headless) bolt.
STEP FIVE--Installing the Pillars Now is the time to place the pillars. Screw the top half of the front pillar and middle pillar (if the action has a middle bolt) to the action with the tapered head bolt. Screw in the headless bolt and slip the pillar down around it. Apply release agent to the area of the guard around the rear bolt hole (and to the rear headless bolt). Apply top and bottom and from the inside out. We don't want the guard stuck to the bedding. (This guard sits on the bolt head that is secures the middle pillar to the action. We need the guard in place to align the action in the stock.)
Install the trigger guard back in place on the stock as the guard is used to align the barreled action in the stock. Now is the time to make a trial run to ensure that everything fits properly. Slip the upside-down stock down over the pillars with the headless bolt coming up through the rear bolt hole in the guard. See Photo 7. Ensure that the stock is resting on two spots only--the tape you've wrapped around the barrel, and the little bit of wood you left behind the tang bolt. Ensure there is room everywhere around the action to accept the mud. The barreled action cannot be touching anywhere except the tape and the tang. Not even on the top edges of the stock.
STEP SIX--Applying the Mud Mix up a generous portion of the Devcon 10110 Mud and apply to the pillars as shown in Photo 8. Do not get mud on top of the bolt head and front pillar(s). Do apply a little mud on top of the rear pillar and if a little gets on the headless bolt that is OK as you should have applied release agent to this bolt. This will properly bed the guard to the rear pillar. The front bolt that holds the front pillar need not have release agent applied to it. Note, as shown in Photo 8, each pillar has a bolt inserted.
PHOTO 8 -- Showing mud on the pillars.
You cannot use too much mud as the hydraulic action of pressing the stock down on the barreled action is going to squeeze the mud everywhere it need to go and the excess will be forced out (falling on the floor for you to step in).
PHOTO 9 -- Showing mud applied to stock.
Now apply the mud very generously to the stock as shown in Photo 9 above. If I am not bedding any portion of the barrel shank I will only apply a little mud behind the recoil lug area.
STEP SEVEN--Assembly and Compression Now slip the upside-down stock down over the pillars as you did in the trial run. Ensure the stock is bottomed-out on the tape at the front end. Squeeze slowly, pressing the rear of the stock down and squeeze out the excess mud. After pressing the stock down, the action area should appear as in Photo 10. During the compression stage, stop a few times and use Q-tips to clean off the excess mud that is squeezing out between action and stock.
PHOTO 10 -- Rifle right side up, with the mud squeezed out.
Cut a piece of paper towel about two inches wide by the length of the towel. Lay this on the stock 1.5" in front of the action. Wrap black electrical tape around the stock and barrel, running the tape over the strip of paper towel. (The towel is to protect the stock finish.) Squeeze the stock and action together while taking wraps with the tape. If you have a skinny, pencil-thin barrel don't apply too much pressure with the tape as the weak barrel can be curved slightly. That can cause the barrel to touch the stock when everything is done (not good). If you have a big, fat barrel don't worry about deflection. With a heavy contour tube, whatever bend you put in the barrel will spring back when the tape is removed.
STEP EIGHT--Mud Removal and Curing Time Using Q-tips, clean up very thoroughly around the front pillar and the bolt head. You need to be able to unscrew the bolt to separate the stock from the rifle and you do not want the bedding protruding above the pillar. (The escutcheon still has to have room to fit in there without touching the end of the pillar.) Before turning the rifle right-side-up, reach under with a few Q-tips and clean off the mud hanging there as it may get inside the action.
Turn the rifle right side up in the vise and, using lots of Q-tips, clean all of the mud off of everything. Remove the excess mud every place you can see it. Use a paper towel to wipe the stock as there could be some invisible mud hiding somewhere on the stock or action. After using Q-tips, I sometimes use Butch's Bore Shine solvent. It does a good job of removing the mud residue (other solvents with ammonia would work well also).
When you've cleaned off all the excess mud. It's time to let the bedding cure. Lie the rifle upside down with the weight on the rear of the action and about where the tape is on the barrel. Let the gun sit for about 8 to 10 hours or overnight. IMPORTANT, you should remove ALL the excess mud around the action before you let the rifle cure for this time period. Photo 11 shows the rifle upside down, but you want to have the excess mud cleaned off before curing.
PHOTO 11 -- Position for curing the mud--but excess should be removed first.
STEP NINE--Popping the Barreled Action Loose After the required curing time, you need to remove the barreled action to check the beading and fit the pillar escutcheons. If you cleaned away all the excess mud and there are no mechanical locks in the bedding, it should not be difficult to pop the stock loose. You can see how this is done in the short Video Clip from my DVD (Right-Click and "Save As" to download). Here is the procedure.
After the mud has set up and hardened, clamp the barrel in a vise with the gun upside down. The vise should camp just ahead of the forearm. Remove the bolt in the front pillar (and middle pillar) and the headless bolt. Remove the trigger guard.
With the left hand apply upward pressure to the forearm and then with the righthand slap upward on the forearm. You will hear a crack like you might have busted the stock. Not to worry, that is just the bedding popping free. Now wiggle the stock up off the recoil lug as it is the only thing holding the stock down. [Editors Note: Watch the video clip! It shows Richard "popping" the stock loose from the barreled action. CLICK HERE to download a 6 Meg Windows media file, or click these links for MPEG (2.3 megs), and Real Media (2.3 megs) versions.]
Remove the tape from the barrel and recoil lug and clean up the putty. Wipe the action down with brake parts cleaner. On the stock, remove the squeezed mud that went into the trigger and bolt release area. Relieve the lug area on both sides and the front. Lay the stock back on the barreled action. Be sure to check under the trigger guard to see if any cleanup of mud is required there. Then re-install the guard and insert the rear action bolt just snug (not tight).
STEP TEN--Installing the Pillar Escutcheons Pillar escutcheons are a nice extra feature I add to my custom rifles. These are stainless, made from barrel stubs. The two-part front pillar is originally machined as one piece. I believe front pillars with the escutcheons (or outer ring) offer advantages over conventional pillars in terms of strength and alignment.
Before you actually install the escutcheons, you need to do some fit testing. Have a trial run at setting the front bolt to the proper length by placing the escutcheon in the hole and screwing in the bolt. Loosen off the back bolt to see if the bolt that is thru the escutcheon is holding the stock firmly in place. Retighten the rear bolt a wee bit.
Apply release agent to the front bolt, being careful to not get it on the escutcheon. Insert a allen wrench into the head of the bolt so you can hold it easily. Slip the escutcheon over the bolt. Apply mud to the escutcheon and around the bolt. Photo 12 shows how much mud to put on the escutchen. You want enough so when you tighten the bolt it will force the mud everywhere it needs to go, even though a bit will be squeezed in around the bolt. Photo 13 shows how the escutcheon should look installed, with the bolt tightened. Photo 14 (below right) shows the escutcheon after the mud has been removed--be sure to remove the excess while the Devcon is still soft.
PHOTOS 13 and 14 -- Showing escutcheon before (left) and after mud clean-up (right).
Clean up the excess mud with Q-tips and paper towels. You need to do this before the mud hardens. I used Butch's Bore Shine as a solvent, once I have removed the excess mud with Q-tips and towels. When the escutcheons are cleaned up, you've finished working with the mud. Now let the stock lay for another 8 hours or so to allow the escutcheons to become.
After the mud has hardened around the escutcheon clamp the rifle back in the vise. Remove the back tang bolt first then the front bolt that is through the escutcheon. The bolt will be tight in the hole and sometimes may need to be punched out with a punch unless it has threads right to the head in which case it will screw out. Go in the hole with a .260” bit and clean the mud out of the front pillar. Let the bedding harden for a day or two and then torque the bolts with about 35 inch lbs of torque on the front bolt and maybe 25 on the tang bolt.
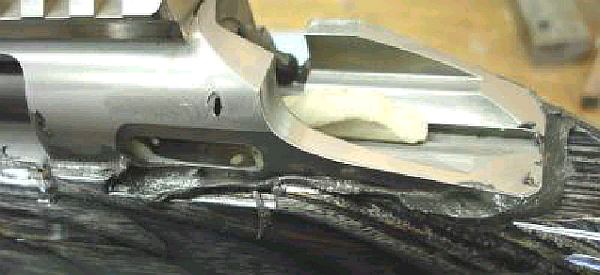
The finished result is an even coat of Devcon with no voids, air pockets, fissures, and perfect stress-free support for the action, as shown in Photo 15.


 Richard Franklin prepared this article for our readers. Richard tells us: "I'm happy to do pillar-bedding work, but this is a job which many shooters can do themselves, with some practice and the right components. I do suggest you practice first on an old 'beater stock'. When done right, you end up with a perfect fit of receiver to action, with no twisting, stretching, or compression forces being applied to the receiver through mis-alignment. That's what I mean by 'stress-free'."
 Pillars For Bedding
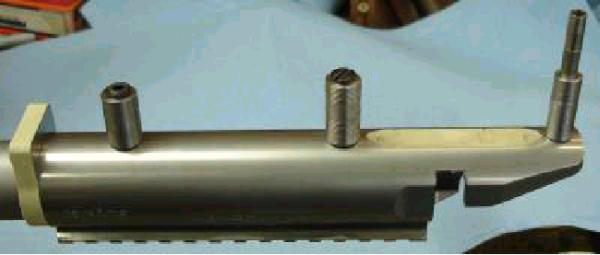

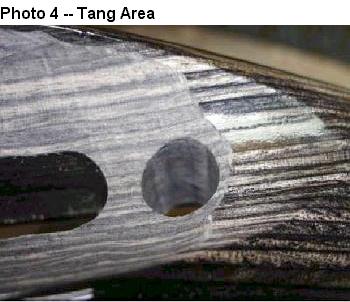 Photo 3 shows the wood removed from the inside of the stock bedding area. Remove enough wood everywhere except along the top sides of the stock to allow at least 1/8" to 3/16th" of room for the mud. Remove 1/4" of wood behind the recoil lug. I like about .012" clearance on the top inside edges.
 The idea is that the barreled action does not touch anything except the bit of original "elevation" wood left at the rear tang (behind the pillar) and the forearm resting on the electrical tape. This is very important to obtain 100% stress-free bedding. You want the bore of the barrel to be parallel with the top edge of the stock so wrap just the right amount of tape to ensure this. The tape also centers the barrel in the fore-arm. Done right, the barreled action will be contacting just at two points (tape in front, tang in rear) and the barrel's bore will be parallel with the top of the fore-arm's sidewalls.
 Bedding Compounds
 Contoured vs. Straight (Flat-top) Pillars
 Install the trigger guard back in place on the stock as the guard is used to align the barreled action in the stock. Now is the time to make a trial run to ensure that everything fits properly. Slip the upside-down stock down over the pillars with the headless bolt coming up through the rear bolt hole in the guard. See Photo 7. Ensure that the stock is resting on two spots only--the tape you've wrapped around the barrel, and the little bit of wood you left behind the tang bolt. Ensure there is room everywhere around the action to accept the mud. The barreled action cannot be touching anywhere except the tape and the tang. Not even on the top edges of the stock.


 Before you actually install the escutcheons, you need to do some fit testing. Have a trial run at setting the front bolt to the proper length by placing the escutcheon in the hole and screwing in the bolt. Loosen off the back bolt to see if the bolt that is thru the escutcheon is holding the stock firmly in place. Retighten the rear bolt a wee bit.

