|
One of the Many Great Articles from the Archives of Precision Shooting Magazine...

Copyright © 2003 Precision Shooting Magazine. Reprinted by permission, all rights reserved.
Preparing Cases for
Long-Range Accuracy
by Jacob Gottfredson
I have always been a little amazed that loads with relatively large velocity spreads and standard deviations sometimes produce the best groups in 100- and 200-yard benchrest. I have no reasonable explanation for that. My guess is that velocity spreads within reason don't adversely affect harmonics or the distribution of nodes. Bullets shot in 100- and 200-yard benchrest are also flat-based projectiles that stabilize more quickly than the average, long-range boat tail bullet.
Shooting at long range is an entirely different animal. Often the reverse is true. That is, while the bullets used for long range sometimes don't stabilize fully for 300 yards or so, their velocity spread and standard deviation might be small. And in long-range shooting that is one key to success. Thousand-yard competitors are shooting 3.5", 5-round groups and 6", 10-round groups with regularity. World records continue to be set that are astonishingly small at such a great distance.

These feats cannot be accomplished when velocity and pressure vary between shots. Velocity spreads of 25 fps with muzzle velocities of 3000 to 3500 fps produce enough vertical at 1000 yards to make it impossible to compete successfully against today's top level shooters. If you argue that wind doping is more important, I would have to agree. But in light to moderate steady winds, or in the so-called trigger-pulling contest, vertical dispersion becomes important.
|
|
While there are a great many variables that affect accuracy, velocity spread, pressure variation, and standard deviation, case preparation is certainly one of them. This article will outline one method of preparing cases in a pictorial sequence. Each step will include the action taken, the reason it was taken, and the method used to accomplish it.
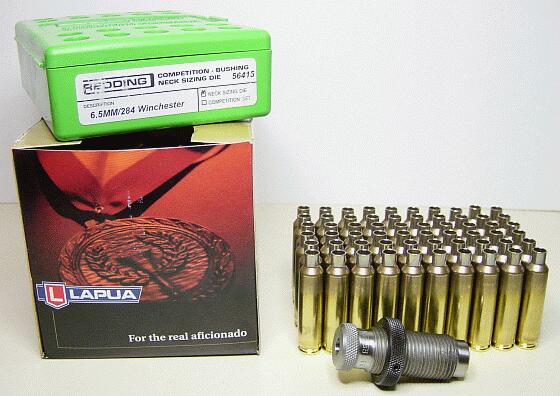
Step 1
Make the neck-shoulder junction to head length and outside case dimensions identical for all cases.
Reason: When we turn the necks, the blade will bite into the shoulder the same distance for each case.
Method: Use a Redding Body Die or Full-Length Sizing Die to force the shoulder and body into a standard configuration. Redding's Body Die for the 6.5x284 is shown with sized Lapua cases.
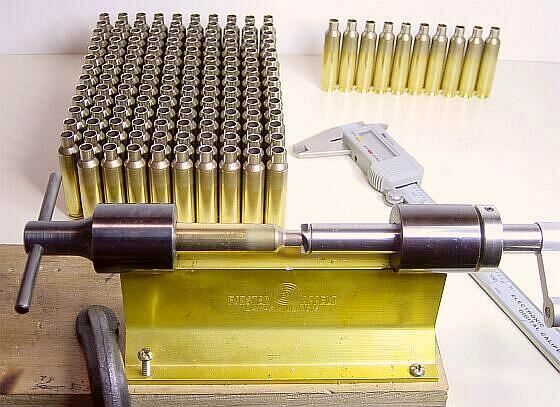
Step 2
Trim the cases to the same overall length.
Reason: This is the second step required to cut the necks to the same depth into the shoulder. It also makes the length of the neck gripping the bullet identical for each case.
Method: Shown is a Forster Case Trimmer that allows fast, accurate trimming.
Step 3
Chamfer the ends of the necks.
Reason: Trimming cases to length leaves a burr on the neck. Chamfering will remove it, allowing the expansion die to enter the neck easily.
Method: An RCBS chamfering tool is set into a holder that is in turn attached to a cordless drill to speed up the process. A deep chamfer is NOT needed for this operation or for boat tail bullets.

Let me stop a moment to talk about case neck thickness. Chambers are sometimes configured as "tight necks", particularly in certain competitive chambers. These chambers will not accept the neck thickness of original cases, which must be turned. Tight neck chambers are accomplished with the use of custom reamers that either the shooter or the gunsmith owns. The neck dimension is then known and the neck turned to approximately .002" to .004" less than that dimension. SAAMI chamber dimensions, on the other hand, are often not known by the shooter, but they are sized within a tolerance. Chambers cut to SAAMI specs might end up being at the small end or the large end of that tolerance. If the chamber is SAAMI spec, turn the minimum off the necks. Measuring several of the necks with a ball micrometer and setting the turner to the minimum dimension can accomplish this. In some cases you will find that a portion of the neck was not cut at all. That is OK. A step to follow will show you how correct tension is accomplished for either a tight or SAAMI chamber.
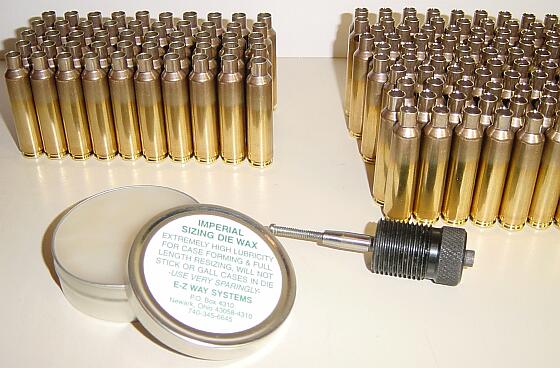
Step 4
Expand the necks to a uniform diameter.
Reason: It is important that the expanded neck fits the neck turning mandrel correctly.
Method: A K&M expansion die is used because it produces a perfect fit of the neck on the K&M neck turner. The K&M neck-turning tool is used because it allows the user to turn the blade in or out, the bias of the blade is correct, and it has been beveled to cut correctly into the shoulder. Use Imperial Die Wax for this operation by applying it to the mandrel each time a case neck is expanded. Do not remove the wax inside the neck. If this operation is difficult, apply wax to the inside of the case neck with a cue tip as well.
Step 5
Turn the case necks.
Reason: A neck that is uniform in thickness helps improve both bullet release tension and case/bullet concentricity.
Method: Use a K&M neck turner with a cordless drill and a K&M, Sinclair, or Hart shell holder. Start the case neck onto the mandrel of the turner. Apply a small amount of light oil to the mandrel and the case neck. Using the drill, run the neck into the blade and move forward slowly until the end of the neck is stopped by the mandrel's shelf. Adjust the mandrel so that this distance will cut into the shoulder approximately 1/32 of an inch. This will help prevent a doughnut from forming in the neck. When the neck encounters the mandrel's shelf and the blade is cutting the shoulder, push the neck turner clockwise to cut deeply into the neck. Remove the case from the turner very slowly as the drill turns so that all metal is cut from the neck to the desired depth with no ridges. TIP: When the neck is off the turner, allow the drill to continue turning the case while you wipe the outside with a paper towel or cloth. Use a cue tip inside the neck while the drill is turning to wipe the inside of the neck.

Note that when the case neck is turned, the turner is forced into the shoulder of the case approximately 1/32 or more to prevent the formation of a doughnut in the neck. The edge of the cut is on the outside of the case after turning is complete. However, when the case is fired for the first time, that edge is forced to the inside as the case conforms to the chamber wall. That edge travels forward as the case is fire-formed and for a few firings after that. if that edge gets into the neck, pressure varies, producing differential velocity from case to case.
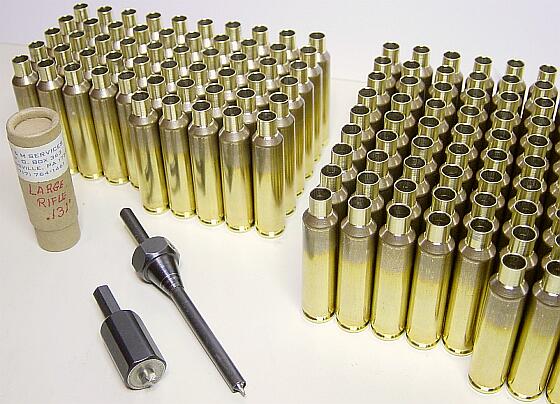
Step 6
Make both the flash hole and primer pocket uniform.
Reason: This will produce more uniform ignition from case to case.
Method: The flash hole deburring tool from Sinclair has a coned, moveable flange on the shaft. When adjusted correctly, the neck will be stopped by the coned flange at the correct depth. Do not increase the size of the flash hole. Just deburr it and make it uniform. The primer pocket tool from K&M can be used with a drill. It is not necessary to cut the entire bottom of the pocket, just cut enough to ensure that the rim of the primer will seat flatly, and that the primer is just below the head of the case and is uniform from case to case. [Editor's note: For 6BR cases using Lapua brass, we do not think it is necessary to uniform the primer pockets or ream the flash holes. In fact, most of the tools available for PPC/BR flash hole reaming will increase the flash hole diameter excessively. With Lapua 6BR brass, our tests have shown lower ES and SD with untouched flash holes. For other calibers and non-Lapua brass, uniforming primer pockets and flash holes may be beneficial.]
With the completion of Step 6 we have cases that are identical on the outside in every way. The overall length is the same. The length of the neck and shoulder are the same. The distance from the neck-shoulder juncture to the head is the same. The neck thickness and length are the same. The outside dimension of the cases are the same. We must now consider the weight and the internal volume.
Step 7
Check for concentricity close to the shoulder and midway along the neck.
Reason: To know that the cases are straight and to later check the straightness of the dies and the chamber.
Method: Use a concentricity tool such as this one provided by Sinclair. In most instances, the cases will vary approximately .001 to .003 at the shoulder and .010 to .015 on the neck at this stage of preparation. After fire-forming, that dimension should be reduced to approximately .0 to .001 on the shoulder and .003 to .005 on the neck if the chamber is straight. After neck sizing, those dimensions should remain the same or the neck concentricity may improve. If not, this operation will let you know which is not concentric and needs replacing.
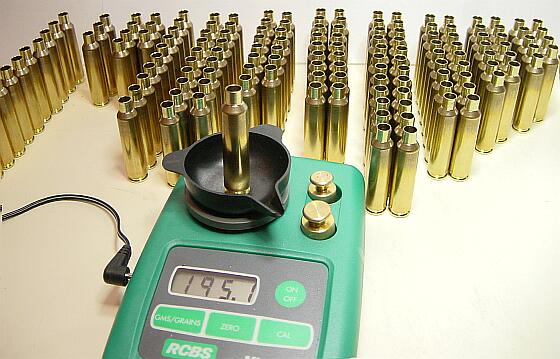
Step 8
Weigh the cases and separate by lots not greater than one grain in weight difference or about 0.5 percent.
Reason: We know that the outside dimension of each case is the same as all other cases. A weight difference between cases means that the interior is different in volume or the head is different in size. A case that is heavier than the others indicates less interior volume, and the pressure will be greater than for those cases that weigh less. Differential pressure results in variations in velocity and larger long-range groups.
Method: Weigh each case on a reasonably accurate scale such as this RCBS electronic scale. Pay close attention to ensure that the scale is reading accurately.
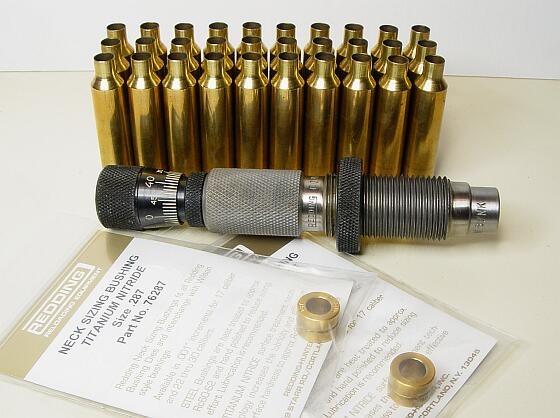
Step 9
Neck-size the cases.
Reason: Adjust the neck tension and length of sizing to produce the best groups, least velocity spread, and least standard deviation.
Method: Use a Redding Neck Sizing Die that incorporates sizing bushings. Estimate the size of the bushing in the following manner. Add the thickness of the neck wall times two to the diameter of the bullet. Order 3 neck sizing bushings to start. One that is .002 less than the dimension above, one that is .001 less and one that is .003 less. Example: for a .264 bullet in a 6.5x284 SAAMI spec chamber with the necks turned to .0125" thick, the formula would be: .264 + 2(.0125) = .289". Order the first bushing at .289 - .002 = .287". Order two more a thousandths less and a thousandths more, that is, .286" and .288".
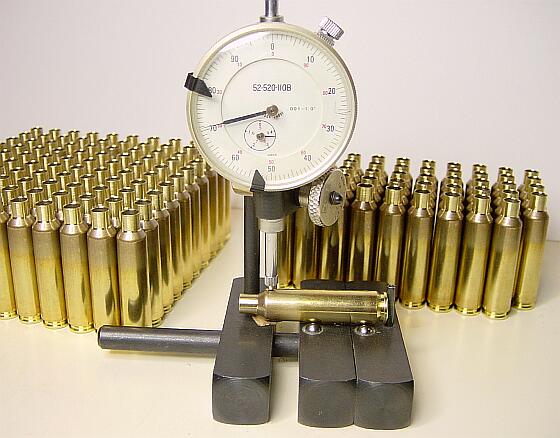
Step 10
Determine and size to correct head space.
Reason: This step helps ensure maximum case life, consistent ignition, pressure, and accuracy.
Method: Use the Redding Instant Indicator Die. This tool has many uses among which is the ability to determine head space in relation to the SAAMI datum length. For example, the distance from the head to the datum line on the shoulder of the 6.5x284 is 1.8100/1.8200. The indicator is calibrated using a supplied gage. Once calibrated the gage is removed and several well formed cases (in your rifle) are measured. The highest reading will most closely indicate the datum line of your rifle. For example, if the dial reads .004, this indicates that your chamber is .004" longer than the minimum, but well within the .010" tolerance that SAAMI allows for most cartridges. Cases should then be sized so that the shoulder is "bumped" approximately .002 to .003". Redding's Instant Indicator Die is made to also check bullet seating depth, bullet uniformity (base to ogive), and case length.

Step 11
Remove a doughnut as necessary and square the head of the case.
Reason: In some instances a doughnut will form in the neck regardless of our best efforts. The doughnut must be removed to produce consistent pressure. The head should also be squared for proper chambering.
Method: K&M has developed a mandrel that will fit the neck-turning tool. The mandrel's end is configured to cut excess metal from the neck. A Sinclair length trimming tool can be used to make the heads square with the base.

Photo 11 shows K&M's newest additions to the neck turning tool. A fixture can be attached to your present tool to facilitate precise setting of the mandrel. A dial indicator can also be added to monitor neck thickness. Note that in the photo the mandrel used to remove interior metal from the neck commonly referred to as the "doughnut" has been installed. In most cases the neck-turning mandrel would be in place.
The Ongoing Task--Maintaining Case Quality After Fire-Forming
After fire-forming cases, run the necks through the neck-turning tool again. Do not reset the tool. When the case is fired, metal will turn plastic under extreme pressure and stress and will flow to conform to the chamber wall. As it does, the neck of the case will again vary slightly in thickness. Turning the case neck a second time after fire-forming will remove those tiny anomalies. This operation is relatively fast.
Some reloaders turn the neck twice prior to fire-forming, taking most of the brass off in the first cut, and then finishing to the final dimensional cut with another turner or by adjusting the same turner. I don't find this to be necessary if the neck is turned carefully and then again with the same setting after fire-forming, particularly with SAAMI spec chambers. One thing to remember: stop turning cases when the turner gets hot. Wait for it to cool or dip it in water. The turner will spring slightly when hot and will change the thickness of the cut.
Keeping cases maintained by cleaning the necks and primer pockets after each firing is something many competitive shooters do. If one looks into a case that has been fired several times, one will see a crust of hard powder that will often flake off. For this reason, some shooters like to neck size using a knock out die, theorizing that at least some of the crust inside the case will flake off. They hit the end of the case neck against something to dispel these flakes of burned powder after using the knock out die. By the way, looking inside cases with a bore scope is an easy way to see if a radial crack is starting to develop near the head from over sizing.
| The Big Picture--Elements of Accuracy
How Case Uniformity Aids Accuracy
 You should now have a set of matched cases. These in no way resemble what ammunition manufactures call match ammo or match cases. This set of cases are exactly the same length, the same weight, have the same internal volume, the same neck thickness that is sized to grip each bullet identically, assuming the bullets are identical in diameter. They have exactly the same flash hole dimension and the same primer pocket depth. Although this is not all there is to producing single-digit velocity and standard deviation readings, at least the boiler room is not the problem. Bullets must be consistent in weight and diameter; their center of form must match their center of gravity; concentricity must be uniform and small; they must fit the bore correctly; and the bearing surface must be of a consistent length. Various primers must be tried to achieve consistent ignition. Different powder types and weights as well as seating depth must be tried in an effort to drive velocity and standard deviations into the single-digit range. You should now have a set of matched cases. These in no way resemble what ammunition manufactures call match ammo or match cases. This set of cases are exactly the same length, the same weight, have the same internal volume, the same neck thickness that is sized to grip each bullet identically, assuming the bullets are identical in diameter. They have exactly the same flash hole dimension and the same primer pocket depth. Although this is not all there is to producing single-digit velocity and standard deviation readings, at least the boiler room is not the problem. Bullets must be consistent in weight and diameter; their center of form must match their center of gravity; concentricity must be uniform and small; they must fit the bore correctly; and the bearing surface must be of a consistent length. Various primers must be tried to achieve consistent ignition. Different powder types and weights as well as seating depth must be tried in an effort to drive velocity and standard deviations into the single-digit range.
More Thoughts from Jake on Accuracy--It Still Takes a Good Shooter
There are as many methods to accomplish what has been written here as there are shooters preparing cases. But for those of you about to make the decision to develop a set of match cases, this will get you started.
I don't wish to bust anyone's bubble, but the development of long range accuracy does not stop with case preparation or any of the other little chores we set ourselves to doing. In the final analysis it is the rifle's driver that makes the real difference...a result of practice and talent. While I hate to admit it, the point was driven home in an embarrassing manner just this past weekend. At the conclusion of a recent sniper match, I bragged that I had a rifle that no rifle presently on the range could match at 1000 yards. Some fool took my challenge, suggesting that he could beat me with his pip squeak 18" barreled .223 AR and some 77 grain match ammo from Black Hills Ammunition. The 190 grain Sierra MatchKing bullets from my 1000 yard 16.5 pound benchrest rifle moves along at 3400 fps. He would require nearly 3 times the elevation and more than double the windage. My challenger was surely a bit daft.
The wind was blowing from 10 to 15 mph and switching from 3 to 9 o'clock. The mirage was a sea of murk, and the heat was oppressive when we climbed the tower at Rifles Only. The bet was the most hits on a 20 x 30" steel target (called an Iron Maiden) out of ten shots. He insisted that I go first. I bit into the steel at center of mass 6 times, but missed 6" or so on either side in switches that I did not dope correctly. I had developed the 82 grains of MRP load in 70 degree weather. They weren't taking to the 100 degrees and 115 degree heat index on the tower after sitting in the car all day at 150 degrees. I lost several primers and ruined 10 hard earned cases. To my surprise and chagrin, James Anthony drove several of the tiny 77 grain factory loaded bullets from his cute little tactical rifle into the target's left shoulder area. The hits were much harder to see at that distance than the big 190 grainers, so we drove to the 1000 yard line to have a closer look. There were several other marks on the white painted steel that were not easily identifiable. They may have been from previous hits or paint flaked when the big 190-grain bullets hit the steel. We counted at least six hits of the little 77 grainers, but there very well may have been more. I had printed my six, 190-grain MatchKings at center mass and the marks were unmistakable. In fact we could see them hit at 1000 yards.
The morale is this: You can't buy talent. It matters not how perfect your ammo and rifle are if you cannot properly execute the delivery. The problem, of course, is that in competition such as the upcoming 1000 yard nationals, there will be scores of people who have not only taken the time to produce perfect cases and small velocity spreads of their ammo, but whose delivery is nearly perfect as well. Certainly, the great Skip Talbot could have driven my ten, 190-grainers into a 4 or 5 inch group at mid-chest as I have seen him do many times before, thus proving my original claim that I had a rifle that could out shoot any rifle on the range. Ah well …
My point is that time spent on the range and talent are more important than perfect cases, et al. Only luck will beat practice and talent combined with properly prepared cases and equipment. |
 About the Author About the Author
Jacob Gottfredson has written for several magazines for the past 20 years, including GUNS, Guns & Ammo, Safari, Tactical Shooter, The Accurate Rifle, SWAT, Tactical Response, and Precision Shooting magazines. He specializes in long-range, precision rifle, technical reloading, and optics. He has contributed chapters to four books. An ex-Special Forces soldier, Jacob has competed in Sniper and Tactical competitions for several years. For the past 25 years, he has competed in 100/200/300 and 1000-yard benchrest competition. He has hunted since the age of eight, taking him to Canada, Alaska, and Africa. He grew up in the Rocky Mountains hunting deer and elk as well varmints of all sorts. Jacob has degrees in math and engineering, and he holds a masters degree in structural engineering. Jacob presently owns and operates an engineering firm, and is a Professional Engineer in Texas and Utah. |
| Contact Information for Manufacturers Mentioned in this Article | Forster Precision Products
310 Lanark Avenue
Lanark, Illinois 61046
Phone: 815-493-6360
Fax: 815-493-2371
Email: info@forsterproducts.com
Web: www.forsterproducts.com
K&M Services
5430 Salmon Run Road
Dover, PA 17315
Phone: 717-292-3175
Redding Reloading Equipment
1089 Starr Road
Cortland, NY 13045
Phone: 607-753-3331
Fax: 607-756-8445
Email: Techline@Redding-Reloading.com
Web: www.redding-reloading.com |
RCBS
Phone: 800-533-5000 or 530-533-5191
Web: www.rcbs.com
Robert W. Hart & Son, Inc.
401 Montgomery Street
Nescopeck, PA 18635
Phone: 800-368-3656
Fax: 570-752-1088
Email: rwhart@sunlink.net
Web: www.rwhart.com
Sinclair International
2330 Wayne Haven Street
Fort Wayne, Indiana 46803
Phone: 219-493-1858
Fax: 219-493-2530
Email: sinclair@ctlnet.com
Web: www.sinclairintl.com |


|

