|
6BR Savage Pac-Nor "Silk Purse"
The Poor Man's Hammer, Part One
Other Guns of the Week >
We have featured some pretty high-dollar Guns of the Week, including $4000 showpieces campaigned by some of the nation's top shooters. But, not all of us, including your humble Moderator, can afford all the latest and greatest equipment. This week we offer something completely different--a Poor Man's precision rifle, built on an inexpensive Savage short action. The project turned out better than expected. With a new stock, a new caliber, and a tack-driving Pac-Nor barrel, a homely Savage was transformed into a very accurate 6mm BR. Starting with an AccuTrigger Savage, you could duplicate this rifle for about $1000, less optics. If you're thinking about making the jump into a 6BR, here's a sweet-shooting option that won't break the bank.
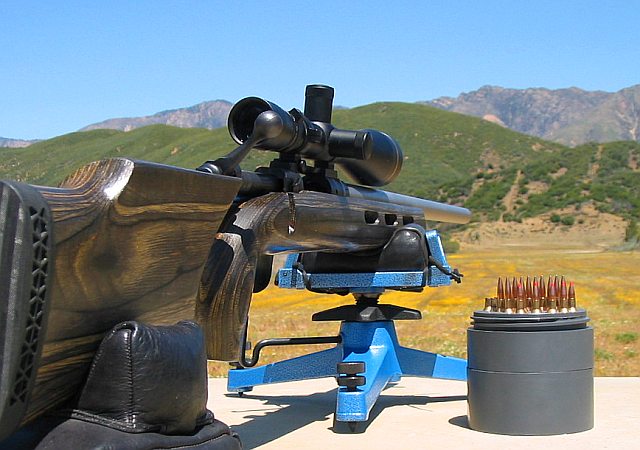
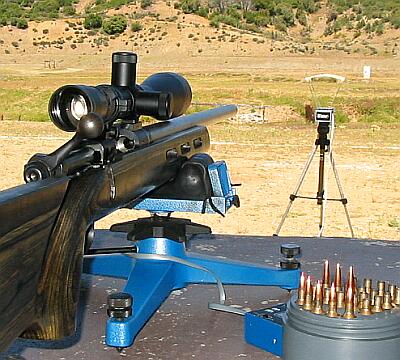
The view from the 600-yard line at the Ojai Valley Gun Club, Rose Valley, CA. A great place to shoot--but the winds will humble you.
The "Silk Purse Project"--Transforming a Factory Savage
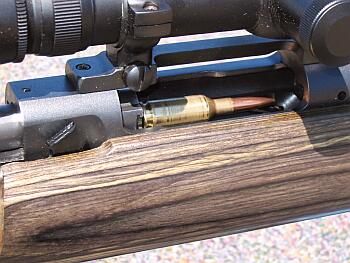
Last fall, I decided to re-barrel a Savage 10FP to 6BR. This gun was one of the very last Savages chambered in .260 Remington. It had been a decent shooter for a factory gun, but I was fed up with the fouling, and erratic POI, especially with the VLD bullets. I had also grown tired of dealing with the hassle of forming .260 cases from .243 brass, and persistent problems with doughnuts in the .260 necks. I contacted Dave Kiff and proposed that we develop a set of 6BR reamer prints for many of the most popular bullets: 107 SMK, 105 Lapua Scenar, 105 Hornady Amax, 95gr Berger VLD, and 87 V-Max. We also wanted to spec the reamer to work with Lapua 90gr and 105gr loaded ammmo. I sent Dave a set of dummy rounds with the base of the bearing surfaces about .060 from the neck-shoulder junction. It took some doing, but we also managed to "borrow" some loaded Lapua ammo for Dave to measure.
Dave measured all the dummy rounds and Lapua factory ammo, crunched the numbers and came up with a new reamer design. This "do it all" reamer features a .272" "no-turn" neck and a .073" Freebore. With this leade length you can keep the 105-107 grain bullets up out of the neck-shoulder junction (avoiding the "doughnut zone"), and you still have enough length to reach the lands with the 70 grain match bullets and 80-grain Fowlers. Plus the reamer works perfectly with Lapua loaded ammo, both 90gr and 105gr.
 Once the reamer was completed, Dave sent it off to Chris Dichter at Pac-Nor. Chris was really positive about the project, and like Dave and I, he was curious to see what kind of accuracy a Savage could achieve with an optimized chamber and a top-end barrel. We were also planning to test the gun with Lapua loaded ammo, but we never were able to get our hands on an adequate quantity for testing. (Lapua has told us a shipment should be arriving soon.) Pac-Nor removed the 24" "foul-o-matic" factory tube and replaced it with a beautiful 27" 8-twist stainless SuperMatch, using the regular Savage nut for headspacing. Having experienced some heat-related issues with the Savage factory varmint contour barrel, I specified a larger barrel diameter. This is turned down near the tenon to fit the barrel nut, then it runs 1.25" tapering to .093" at the muzzle. Once the reamer was completed, Dave sent it off to Chris Dichter at Pac-Nor. Chris was really positive about the project, and like Dave and I, he was curious to see what kind of accuracy a Savage could achieve with an optimized chamber and a top-end barrel. We were also planning to test the gun with Lapua loaded ammo, but we never were able to get our hands on an adequate quantity for testing. (Lapua has told us a shipment should be arriving soon.) Pac-Nor removed the 24" "foul-o-matic" factory tube and replaced it with a beautiful 27" 8-twist stainless SuperMatch, using the regular Savage nut for headspacing. Having experienced some heat-related issues with the Savage factory varmint contour barrel, I specified a larger barrel diameter. This is turned down near the tenon to fit the barrel nut, then it runs 1.25" tapering to .093" at the muzzle.
When the re-barrelled action arrived I slapped it into the stock and immediately headed to the range. It didn't take long to see this gun could shoot. Impressive is an understatement. The first shot from the barrel went a little high, then the next two shots went into the same hole at 50 yards. The Pac-Nor broke in quickly and the nightmare of fouling I had experienced with the factory barrel was forgotten. And I'd say the average group size (compared to .260 Rem) was reduced by two-thirds. With a wide variety of loads the reborn Savage is producing 3-shot groups in the high ones and twos, with 5-shot groups running .220-.350. Most of the spread in the larger-sized groups is horizontal, suggesting some "driver error" or some wind shifts that I missed. I consider this rifle to be a bonafied quarter-moa stick. And it does that with the 105gr Lapua Scenar bullets. In the future we'll see how it performs with the 70gr and 80gr flat-based match bullets. This rig will never be competitive with a true bench-rest rig--but so far it shows that a low-budget factory gun is capable of remarkable accuracy when re-chambered for 6mm BR. (Perhaps one really can make a "silk purse" from the proverbial sow's ear.)
The Key to Great Accuracy--A Pac-Nor Pre-Fit SuperMatch Barrel
This Savage 10FP was truly re-born with the addition of a 6mm BR Pac-Nor SuperMatch 3-groove barrel. This was a pre-fit unit, with a custom contour (.93" at muzzle), chambered with the .073 freebore PT&G reamer mentioned above. I had heard good things about the Pac-Nor 3-groove design, but the barrel has far exceeded my expectations in every regard--accuracy, lack of fouling, ease of cleaning, and ability to hold vertical through extended strings and rapid fire. The factory Savage .260 barrel shot OK when it was clean and cool, but POI would walk as it heated, and it split groups and threw flyers with regularity. It seemed I could never shoot a dozen shots without a flyer ruining the group.
The Pac-Nor is amazing in that respect. Group size varies of course, mostly depending on how well I hold, but the gun just doesn't produce flyers. With about 250 rounds down the tube so far, only two (non-fouler) shots fired so far at 100 yards (with the Scenar 105s) have not been touching the rest of the group. And those two were also pretty much centered right on top of the group.
And the gun just doesn't foul. Doing a two-shot then clean regimen during break-in, I stopped seeing any copper after 16 rounds. The gun has never seen a brush, and it cleans up with 4-5 wet patches with Montana Extreme. After firing 80 rounds over two days, I finally saw a trace of copper in the ends of the lands, near the muzzle, though this did not affect accuracy. I gave the barrel a quick soak with Wipe-Out and the copper was history. Contrast this with my experience with the Savage factory tube. That barrel would powder foul really badly in 15 rounds or so, and after 25 rounds copper would be so bad that I would have to spend 2 hours or so with multiple applications of Sweets. With the factory barrel, a typical cleaning session would require six or more applications of solvent, lots of brushing, and I'd use three dozen patches. With the Pac-Nor, and Wipe-Out, the gun cleans up in a matter of minutes. In my experience, if you run a couple wet patches through the gun every dozen rounds or so, that's all you really need to do--no brushing, no JB, no Iosso paste.
 Mag-Feeding?--Not a Problem Mag-Feeding?--Not a Problem
The Achilles' Heel of the 6BR cartridge is its shape. With a short, fat body and long, pointy bullets, it can be difficult to feed from magazines designed for more conventional rounds like the .243 Winchester and .22-250. Mike Bryant has come up with a magazine modification for Remington 700 rifles, but nobody, to my knowledge has done any re-engineering for the Savage. Perhaps the reason is that it's not really necessary. I found that my cartridges, loaded with Scenar 105s to 2.350" OAL, worked fine with the factory blind magazine--as long as I worked the bolt slowly and loaded only three rounds. Ejection wasn't always 100%, but with a right port, it is a simple matter to kick the fired case out with your hand before cycling the next round. Now I normally single feed, but it's nice to know the magazine will function without any special modifications. Do note, however, I haven't shot any of the short 68-grain match bullets in this gun yet, so they might be more troublesome.

Savage 10FP Reborn--With a Host of New Components
My Savage was pre-AccuTrigger, so the trigger group was the first thing I modified. I purchased a Sharpshooter Supply Trigger from Fred Moreo. I was able to get the pull weight down to around a pound, but the upgrade was far from painless. First, I had to do a lot of grinding and filing on the factory trigger guard before the trigger unit would fit. Then I found that the trigger is very sensitive to adjustments--there are three screws, adjusting sear engagement, safety contact, and pull weight. I would get everything just the way I wanted, and install the barreled action back in the gun and the safety wouldn't work... or the bolt wouldn't close... or the sear would go off when you bumped the rifle. I also had to file down the bolt release inside the action a bit to get the trigger to work. After the gun was re-stocked (more about that later), the trigger showed a definitive "staginess" or creep. I lived with that for a year until I took the trigger out and, using a screwdriver, pried the side plates apart just a bit. That eased some binding in the unit and the creep disappeared. Needless to say, at about $90 delivered, I wouldn't buy the aftermarket trigger again. Just get a newer Savage equipped with the AccuTrigger.
The injection molded stock that came with the Savage was thin, flexy, and too short for my 6'1" frame. I could see a rub mark on the barrel where the stock was contacting it near the end of the forearm. Needless to say, that wasn't good for accuracy. I read various explanations on the internet about how one could stiffen and/or bed the factory stock to make it better. Frankly, that is all a huge waste of time and energy. Bedding material doesn't adhere well at all to the factory stock and the fore-arm is too thin, even if you succeed in stiffening it successfully with steel rods or the like. There is only one thing to do with a plastic Savage stock--toss it. And don't weep over the loss--a Savage engineer (who asked to remain anonymous) told me the stocks only cost Savage about $12.
At the time, I was still thinking of using the Savage for Silhouette (shot standing) and "Tactical" matches. Consequently I wanted a stock with a raised comb and some drop in the heel. Funds were very limited, so I jumped when I saw a "tactical/varmint" stock on sale at Richard's MicroFit in California. (NOTE: this is not the same as Richard's Custom Rifles in Virginia which makes a far superior product). It was only $220 "fully inletted". Well, when it arrived, it looked like it had been cut with a chisel. The inletting was pretty ragged and much too much wood had bit removed around the trigger area. There was only 1/4" of wood remaining to anchor the rear screw. So, off the stock went to Fred Moreo of Sharpshooter Supply. He built up the rear of the action area with epoxy, then added aluminum pillars contoured to the action. At the same time he "trued" the action and added a thicker recoil lug. Fred's action truing on the Savage is less involved than a full blueprinting job on a Rem 700. To be honest, I don't know if that was really necessary. But, whether because of the new stock or the lug or the action work, the gun definitely shot better after Fred's modifications. Sadly, all that cost me a couple hundred (beyond the stock price), so now I had nearly $1000 tied up in the Savage, what with the new stock and new trigger, and Fred's labor charges. If I was to do it over again, I would get a different stock, probably an MBR Tooley style from Sharpshooter Supply. That would handle much better on the bags, and the price would still be very affordable.
That's No Poor Man's Scope
From the very beginning, this Savage has worn a Leupold 8-25x56 LRT Scope. It may seem odd to have a $900 optic on what was originally a $425 rifle. But I knew that, someday, I'd be building a higher-quality gun (we have a BAT-actioned 6BR in the works), and I figured I'd swap the Leupold to the new gun. Some may question the plane-jane single dovetail Leupold base, but it has worked well. With Burris Signature 30mm rings, the dovetail base allows a nice low profile, that works perfectly in the prone position with the raised comb on the stock. I measured the ring set-up carefully--I can shoot the gun off-hand or prone and the eyepiece is perfectly aligned with my right eye. There is about 1/4" of clearance between the barrel and the front objective bell--no wasted space. Some people question the durability of the Signature rings with their plastic inserts. I can't complain. Zero has been rock-solid and the inserts allow me +20 moa built-in elevation. When I bought the rings a dual dovetail 30mm set of Signatures wasn't available. I would buy the Burris dual dovetail set now rather than the single dovetail because a dual dovetail is more secure--you never have to worry about keeping the rear windage screw tight. A Weaver rail would allow easier scope-removal, but I checked the measurements, and that would raise the sight-line. As it is now, everything is "dialed-in" nicely for shooting prone.
 How Does it Shoot? How Does it Shoot?
Consistently Great--And NO "Flyers"
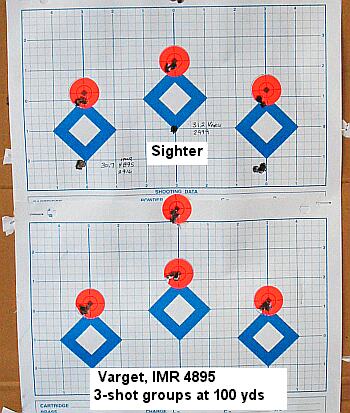
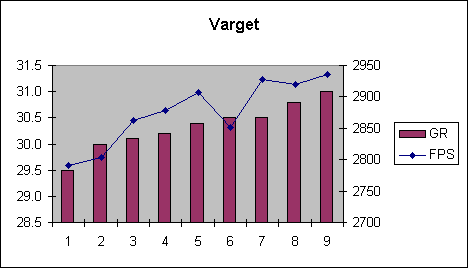
The most remarkable thing about this gun, compared to its previous incarnation as a factory .260 Rem, is consistency. The second and third rounds through the gun went through the same hole during fire-forming at 50 yards. No matter what I feed it, it groups from the high Ones (for three) to the low Threes (for five), and the groups are almost always tight clusters. It has shot great with Varget, IMR 4895, and Norma 203B, from 2720 fps to some charges topping 3000 fps (the 3K loads were very accurate, but ES was high and the brass took a beating). I normally load .015-.022" into the lands, but the few times I tried jumping the bullets .012" it shot equally well. I can't really say what load is the most accurate, because it has become obvious that "driver" skill is really the key factor in group size. My rangemaster, a much better shooter than I, sat down behind the gun and ripped off a .165" three-shot group at 100 yards in gusty winds. His first two shots went through the same hole and he felt he caught a little wind on the third. That was with a load of 30.5gr Varget.
When the gun was a .260 Rem, I could get some very good groups with 100gr Sierra Varmint bullets, but the heavier 140gr class bullets (SMKs, Scenars, Amax) more typically grouped about .6-.7" and split groups were the rule. I'd get three or four shots tight, and the fifth would inevitably be out a half an inch. As a 6BR, this gun just doesn't give flyers. It also proves that the people who say the long 6mm bullets can't group at 100 yards are just wrong.
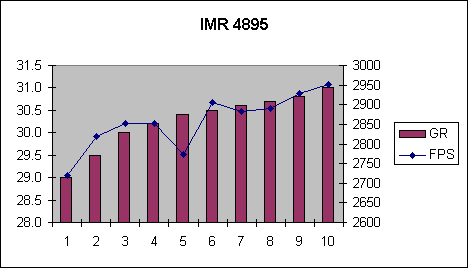
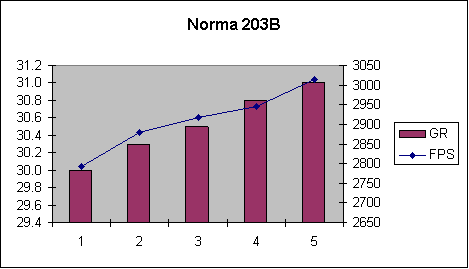
Since the purpose of the gun is to shoot 600-yard Varmint Silhouette matches at the Ojai Gun Club, which has some very challenging winds, I wanted a load that would push a high-BC bullet pretty fast. I was hoping to achieve 2950 fps with good brass life. Well, I reached that velocity, but it was not healthy for the brass. I think I'll settle for something in the 2890-2910 fps range. All three powders (Varget, IMR 4895, and Norma 203B) will deliver this. Initially, I'll probably be using the 4895 in matches as it seems a little more consistent with velocities in the 2900 range than Varget, and it is readily available, unlike Norma 203B.
Tools of the Trade -- My Favorite Reloading Equipment
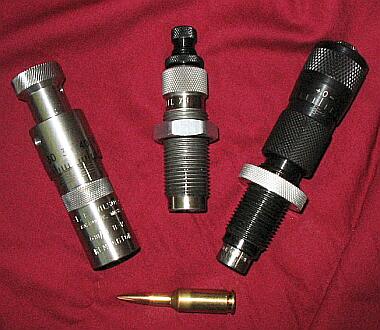
To achieve the kind of results shown in the targets above, you need very good components (Lapua brass and bullets), and high-quality tools. I use dies from three different makers. Most of the time I seat bullets with a stainless Wilson Micrometer seater die. This is one truly superior piece of equipment, worth every penny. When I rotate the bezel one index mark I get exactly .001" change in seating depth. The Wilson is machined like a Swiss watch, and it fits Lapua brass perfectly. I can't praise it highly enough; it is smooth, precise, and simple to use.
 With the hot loads I've been testing, I full-length size my brass each time. I couldn't afford a true custom die, so I called Redding and ordered their standard full-length (non-bushing) die--with a twist. Redding reamed the neck to provide .002 tension for unturned Lapua 6BR brass. Redding did a fantastic job. I now decap and size the brass in one easy step, with no bushings to mess with. I had problems with doughnuts in other guns when using bushing dies. I have a theory that bushings contribute to doughnut formation because they push brass down into the neck-shoulder junction. Well, it looks like that theory may be right. With six loads on some of my 6BR brass there is absolutely no sign of a doughnut. With the hot loads I've been testing, I full-length size my brass each time. I couldn't afford a true custom die, so I called Redding and ordered their standard full-length (non-bushing) die--with a twist. Redding reamed the neck to provide .002 tension for unturned Lapua 6BR brass. Redding did a fantastic job. I now decap and size the brass in one easy step, with no bushings to mess with. I had problems with doughnuts in other guns when using bushing dies. I have a theory that bushings contribute to doughnut formation because they push brass down into the neck-shoulder junction. Well, it looks like that theory may be right. With six loads on some of my 6BR brass there is absolutely no sign of a doughnut.
When a threaded seating die is appropriate, I use a Forster Ultra-Micrometer Seater. I wish the markings were a little easier to read, but other than that, I'm 100% satisfied with the die. The sliding sleeve fits a 6BR case perfectly (with less play than on my Redding Comp Seater Dies for other calibers). The micrometer top moves smoothly, and, like the Wilson Seater, the index marks correspond precisely to changes in seating depth.
 The pride of my reloading bench is my K&M Arbor Press. This unit employs a unique toggle-link that provides ultra-smooth movement of the ram during bullet-seating. In addition, the bottom of the ram features a Bellville Washer stack, which acts as a spring that compresses during the seating stroke. This provides extra feedback during the seating process, and the spring compression can be monitored with an optional strain gauge that fits in the top. When you add the gauge to the unit you get a visual read-out of bullet seating effort. We've found empirically that when bullet seating force varies significantly from round to round, your ES jumps and accuracy falters. Using the K&M Arbor with the optional gauge lets you monitor seating force and thereby load more accurate ammo. It really works, and I'm completely sold on K&M's technology--at least for cases with light to moderate neck tension. The pride of my reloading bench is my K&M Arbor Press. This unit employs a unique toggle-link that provides ultra-smooth movement of the ram during bullet-seating. In addition, the bottom of the ram features a Bellville Washer stack, which acts as a spring that compresses during the seating stroke. This provides extra feedback during the seating process, and the spring compression can be monitored with an optional strain gauge that fits in the top. When you add the gauge to the unit you get a visual read-out of bullet seating effort. We've found empirically that when bullet seating force varies significantly from round to round, your ES jumps and accuracy falters. Using the K&M Arbor with the optional gauge lets you monitor seating force and thereby load more accurate ammo. It really works, and I'm completely sold on K&M's technology--at least for cases with light to moderate neck tension.
Is the K&M press perfect? Well, not quite. To adjust the ram height, you have to loosen four Allen-head bolts. A simple quick-release handle (as found on the Sinclair and Harrell's arbor presses) would be better. But once you've set the height for your dies, that's really not much of an inconvenience. The other thing I noticed is that the K&M, with its spring-loaded ram, could use more leverage when seating cases with a lot of neck tension. I noted that when seating bullets into fresh Lapua brass taken right out of the box, I really had to mash down on the handle to get bullets to seat. For this reason I now slightly expand the necks of Lapua brass for the initial load, or I use the Forster seater in an RCBS turret press. |
 Load Development Load Development
For fire-forming I started with 29.5gr Varget, then bumped that up to an even 30.0gr to get a little better case formation. Bullets were the 105gr Scenars, loaded hard (.020") into the lands to give a good crush fit. I then worked up a ladder with Varget, and accuracy held all the way past 2940 fps, but my brass was taking a beating at the top end. The CCI 450 primers handled the higher pressures fine, but at the high end I did see some loosening of primer pockets.
Frankly, I could have stopped at a charge of 30.5 Varget. That was a good, reliable load that produced excellent velocities with the lowest ES and SD I've yet recorded. In once-fired brass with the factory-spec small flash holes, 30.5 grains was very accurate, with ES of 7 and SD of 4.0. But, like most reloaders, I had to tinker with a good thing so I then used a K&M PPC flash-hole deburring tool to uniform the flash holes. That was a mistake I think. The tool reams the .059" diameter flash holes to about .067"-.069". Lapua uses a special precision process to form the flash holes, and the flash hole diameters are very consistent. I think it is very difficult to ream them and achieve a consistency level equal to the factory flash hole. Moreover, increasing the flash hole diameter seems to have increased ES and SD. From now on, I will leave the flash holes just the way they are.
QuickLOAD Software and Powder Selection
I've been working on a review of QuickLOAD reloading software. In considering various alternatives to Varget, I noted that QuickLOAD predicted that both IMR 4895 (not the H4895) and Norma 203B should provide greater max velocities than Varget. Both IMR 4895 and Norma 203B also can achieve near 100% load density in the standard 6mm BR case. Though Varget had shown excellent accuracy, I wanted to see if IMR 4895 and Norma 203B would really deliver more speed. Reader John Adams was kind enough to donate two cans of the hard-to-find 203B, and I had some IMR 4895 in my powder stock already.
 Of the three powders I tried, Varget probably has a slight accuracy edge, but IMR 4895 and Norma 203B are not far behind. If the 203B was readily available I might concentrate on that because it does appear it can push the 105s a bit faster than Varget, without beating up the cases too much. And it is very accurate at the high end. But right now, nobody stocks Norma powders, so I'll be focusing on the other two powders. I did a lot of testing with IMR 4895 in the last two weeks. It looks promising, it meters a little easier than Varget, and it looks like it will deliver 2900+ with very good accuracy. Speeds up to 2930 fps might be possible. Unfortunately my chronograph had fits with the last set of loads I tried so I can't confirm that. The Shooting Chrony doesn't like bright sun directly overhead. I've gotten the most consistent results on hazy days, with no sun-shields. Yes, there is an Oehler on my wish list. For the upcoming match I'll probably be loading 30.7 grains of IMR 4895, jammed into the lands (but a little less than before, .010" or so--that seems to produce a lower ES). The ES and SD are still higher than I like, but I attribute that to the fact that my current set of brass has been worked very hard. With new Lapua brass, ES was very good during fire-forming. Of the three powders I tried, Varget probably has a slight accuracy edge, but IMR 4895 and Norma 203B are not far behind. If the 203B was readily available I might concentrate on that because it does appear it can push the 105s a bit faster than Varget, without beating up the cases too much. And it is very accurate at the high end. But right now, nobody stocks Norma powders, so I'll be focusing on the other two powders. I did a lot of testing with IMR 4895 in the last two weeks. It looks promising, it meters a little easier than Varget, and it looks like it will deliver 2900+ with very good accuracy. Speeds up to 2930 fps might be possible. Unfortunately my chronograph had fits with the last set of loads I tried so I can't confirm that. The Shooting Chrony doesn't like bright sun directly overhead. I've gotten the most consistent results on hazy days, with no sun-shields. Yes, there is an Oehler on my wish list. For the upcoming match I'll probably be loading 30.7 grains of IMR 4895, jammed into the lands (but a little less than before, .010" or so--that seems to produce a lower ES). The ES and SD are still higher than I like, but I attribute that to the fact that my current set of brass has been worked very hard. With new Lapua brass, ES was very good during fire-forming.
These charts are provided for comparison purposes only. Do NOT use the data as recommended loads in your rifle. We deliberately "pushed the envelope" to see how much the brass could take. The higher listed loads are, in some cases, far in excess of powder manufacturers' max loads.
Be sensible, be safe. With all the powders, we recommend you start at under 30 grains with Lapua 105gr bullets. Work up to 30.5 grains or so in 0.2 grain increments. As you approach max pressure things get dicey fast. With the cases running at 100% load density, we saw a mere 0.1 grain load increase result in up to 20 fps added velocity, with accompanying higher pressures. Also note that very slight variations in seating depth can make a huge difference in pressure.

Pac-Nor Barreling
99299 Overlook Road
Brookings, Oregon 97415
Phone: (541) 469-7330 | FAX: (541) 469-7331

Pacific Tool & Gauge
P.O. Box 2549 - 598 Ave C
White City, OR 97503
Phone: (541) 826-5808 | FAX: (541) 826-5304
All content Copyright © 2005, 6mmBR.com, All Rights Reserved. No reproduction of any content without advanced permission in writing. Graphs generated by MS Excel. Photos shot with Canon PowerShot A60 at 1024x768 resolution.
Topics: 6mm, 6mm BR, 6BR, Norma, .243 Ackley, .243 AI, Savage, Accutrigger, Dave Kiff, PT&G, Pacific Tool, Pac-Nor, PacNOR, Prefit, Richard's Microfit, Redding, Forster Ultra, Wilson, Micrometer, K&M, Arbor Press, 105, varmint, silhouette, 600 yards, F-Class, Benchrest, BR, Bench Rest, Single-shot, competition, rifle accuracy, Norma, 203B, Hodgdon Powder, H4895, IMR, IMR 4895, Varget, Vihtavuori, Berger Bullets, Sierra, Clinch River, Lapua Scenar, Sierra, MatchKing, Competition Shooting, stocks, SuperMatch, Shooting Chrony, Beta Master, Oehler, stainless barrel, reloading, powder, case forming, neck-turning, Lapua Brass, Scenar, bullets, precision.


|

