|
The Art and Science of Annealing
Annealing Basics, Cartridge Metallurgy, and Automated Options
For many reloaders, annealing is a "dark science" that defies easy explanation. When done right, annealing extends brass life and makes neck tension more consistent, something very important for accuracy. There is plenty of evidence that annealing works. Just look at your new Lapua brass--those rainbow colors on the necks are artifacts of annealing. And we know annealing can make your brass shoot better and last longer. Score Shooter of the Year Joe Entrekin has 40+ reloads on his regularly-annealed brass. The smallest 1000-yard 5-shot group ever shot in IBS competition was done with brass annealed after every firing. So, learning how to anneal the right way is something that can benefit every precision shooter. For this feature, IHMSA Champion Silhouette shooter Jim Harris and manufacturer Ken Light explain the "dos and don'ts" of annealing, clarify many common misconceptions, and review the best gear for both manual and automated annealing.
by Jim Harris and Ken Light
Annealing--Basic Concepts
Annealing is a process wherein heat is applied to a metal in order to change its internal structure in such a way that the metal will become softer. Most of us think of "heat treating" when we think of applying heat to a metal in order to change its internal structural properties. The word "heat treating" is most commonly associated with steel. However, the term heat treating is not annealing, except in a general and journalistic sense of the word. Heat-treating refers to a process wherein the metal is made harder. Annealing always means to make the metal softer.
In order to make steel harder, it is heated to some temperature, and then cooled fairly rapidly, although this is not always the case. Brass, on the other hand, cannot be made harder by heating it--ever. Brass is always made softer by heating.
The only way brass can be made harder is to "work" it. That is, the brass must be bent, hammered, shaped or otherwise formed. Once it has been made hard, it can be returned to its "soft" state by annealing. The hardness of brass can be controlled by annealing for a specified time and temperature.
Unlike steel, which will be made harder when it is cooled rapidly, brass is virtually unaffected when it is rapidly cooled. Annealing brass and suddenly quenching it in water will have no measurable effect on the brass. Cartridge cases are made of brass. When cartridge cases have been reloaded a number of times, the case necks become harder. Annealing will return the cartridge case necks to their factory original state.
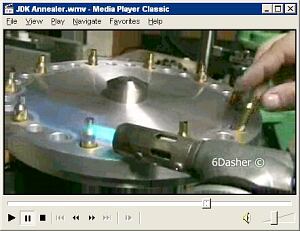 | Annealing Video with Home-Built Carousel
Our Dutch friend Jim DeKort created this 2.5 minute video of his annealing machine in action, processing 6BR cases. This carousel unit, similar to Ken Light's BC 1000, was designed and built by Jim's father. Currently Jim leaves a gap between each shell to allow more "flame time" per case. But he will be adding a second torch soon and then he can have a case in each slot. The cartridges spin in their mounting holes while they are rotated clockwise by the shell wheel. Right-Click on Screenshot and "Save As" to download 2.8 megabyte Windows Media video. Or Right-Click this Movie Link. |
Cartridge Case Annealing
"Properly" annealed cartridge cases are essential to maintaining accuracy and long case life when using hand-loaded ammunition. The question is, what is "properly" annealed? What does annealing do? Can a cartridge case be over annealed? What part of the case should be annealed? Can annealing a cartridge case make it dangerous? Below, you will find the answers to these questions, as well as a number of other questions that you didn't ask.
 A great deal has been written about cartridge case annealing in the popular gun press. A great deal of what has been written about annealing is misleading, with one exception: articles and books by Dean A. Grennell. In his "The ABC's of Reloading" (page 190), Mr. Grennell correctly describes the procedure. Although it is a very short description, it is correct. There is one slight error of fact, but it is on the side of safety and Mr. Grennell cannot be faulted for this in any way. In fact, if you do not have this book I recommend it--even for "experienced" handloaders. There is much valuable information in it, much of it overlooked in other publications. The photo's are profuse and excellent, the explanation clear and concise, and the writing is witty and wry. A great deal has been written about cartridge case annealing in the popular gun press. A great deal of what has been written about annealing is misleading, with one exception: articles and books by Dean A. Grennell. In his "The ABC's of Reloading" (page 190), Mr. Grennell correctly describes the procedure. Although it is a very short description, it is correct. There is one slight error of fact, but it is on the side of safety and Mr. Grennell cannot be faulted for this in any way. In fact, if you do not have this book I recommend it--even for "experienced" handloaders. There is much valuable information in it, much of it overlooked in other publications. The photo's are profuse and excellent, the explanation clear and concise, and the writing is witty and wry.
After wading through this weighty tome, you will know more about annealing and cartridge brass than you probably bargained for.
Few handloaders ever bother to anneal their brass. The few that do are usually dyed-in-the-wool "gun cranks" (to use a rather archaic term from the 1940's), "crazy experimenters" or shooters who are involved in some form of competitive shooting. There is good reason for this, too. Until now, annealing cartridge brass was, at best, a spotty proposition. The brass is either over-annealed, under-annealed, improperly annealed or some combination of all three. Annealing brass is time-consuming, and for the most part, the damn stuff doesn't seem to shoot any better than before it was annealed. Sure, the brass lasts longer, but it does not seem to make any improvements in accuracy. If anything, it might seem to open up groups. So much for the way you used to think about annealing.
Now let's find out about doing it right. Not only will annealing make the brass last up to 10 times longer, but it will tighten up those groups too.
Before I go into the whys and wherefores of cartridge brass and the right way to anneal, let's review the traditional methods of annealing, the attendant disaster, and how they occur.
The "Traditional Methods"--What Works and What Doesn't
The usual procedure is to get a pan, something like a cookie pan, and place enough water in the bottom of it to cover the lower one-third to one-half of the brass. Next the cartridges are stood on their bases in the water. A flame from a propane torch is played over the case necks until the brass "just begins to glow" or "just before it begins to glow". When the magic moment is reached, the annealing is abruptly arrested by knocking over the heated case into the water. The fact that the case neck is heated unevenly and the case-to-case heating is hardly uniform doesn't seem to get much notice.
 The reason for the water is that the bases of the cases must not be annealed, or even heated to any appreciable amount, for reasons you will learn about later on. The reason for the water is that the bases of the cases must not be annealed, or even heated to any appreciable amount, for reasons you will learn about later on.
Another method is to dip the case mouths into molten lead that is at the "correct temperature. Of coarse, there are the problems of lead sticking to the case (soldering), holding the case, and preventing the base from becoming over heated. This process is obviously one for Superman: he could hold the case with his fingers of steel and freeze the base by blowing his supersonic breath over it. Quite frankly, I have never seen anyone use the lead pot method of annealing although I have read many articles describing it. I think I can see why it is not a popular method. [Editor's Note: we strongly recommend that you NOT use the lead-dipping method. The fumes can be hazardous, and a drop of water splash (even a drop of sweat from your brow), can cause the molten lead to splatter dangerously.]
| A third popular method is to anneal cases individually by rotating them through a flame. This is probably the most common method used by novice annealers. The case is either held with fingertips, or some kind of clamping device that allows rotation. This method is described by Earl Naramore in his 1954 book, "Principles and Practices of Loading Ammunition":
"[C]ases are polished and then placed on a small block of wood or metal. The case is placed on the platform and a flame from a suitable torch is played over the neck as the block is turned. This continues until the brass has a slight color change, and then the flame is removed. The flame must be hot enough so that the neck is heated sufficiently fast enough to prevent the base from heating to a critical point." | | Temp-Sensitive Markers for Annealers
Tempil sells both temp sticks and brush-on temp-sensitive laquer. The crayon-like TempilStik leaves a coating on the neck that melts at the point of contact once the surface reaches the product's rated temperature. Tempil temp-sticks work well and are available in most plumbing supply stores. Liquid Tempilaq dries to dull, opaque film once applied. When you heat the necks, and the rated temperature is reached, the film liquefies. Tempilaq works, but we favor the temp sticks--application is faster and less messy, and the change at target temp seems easier to see. A 650°-rated marker is good for starters, but you may need to go higher or lower to get the best results. | 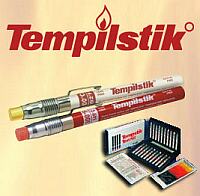 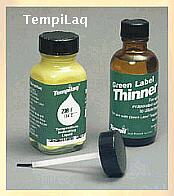 |
|
Needless to say, this procedure will work fairly well, but requires a high degree of skill, particularly if you are relying on your fingertips to judge the correct max temperature. This method is also very S-L-O-W! Can you imagine having to anneal several hundred cases this way? Another drawback to this method is that you will have a decided lack of uniformity on the periphery of the case neck, and the case-to-case results will be even less uniform. So much for the "old methods".
Cartridge Cases and Precision Manufacturing
Our present day cartridge cases represent over one hundred years of continued development and refinement. Cartridge cases are manufactured to exacting standards and tolerances from brass made especially for the purpose.
A cartridge case starts life as a strip of brass. It goes through a number of processes on its way from brass strip to finished cartridge case. It is punched, heated, cooled, cupped, washed, drawn, annealed, formed, "upset" and trimmed and polished, though not necessarily in that order, and I have left out a significant number of steps. Suffice it to say, the manufacture of cartridge brass is involved and exacting. What we get is truly a marvel of manufacturing magic.
Cartridge brass is annealed several times during the manufacturing process. Each step is carefully controlled, and the brass is tested and examined with sophisticated equipment.
As delivered, a cartridge case has a number of properties especially suited for the job it must perform. Most shooters think of the cartridge case merely as a convenient way of keeping the bullet, primer and powder from getting all mixed up and a handy way of stuffing them all into the gun in the proper sequence. As Rodney Dangerfield might say, "It don't get no respect".
The Cartridge Case Inside The Gun
Actually, a cartridge case is the primary component with which we have to deal in hand-loading. Not only that, but it is the cartridge case which seals the chamber when the gun is fired. If it weren't for the amazing properties of the cartridge case, you would get a hot blast of gas in your face every time you pulled the trigger.
After the trigger is pulled, the powder is ignited and creates gas pressure inside the case. Under pressure, the case expands. The outer walls of the cartridge case press against the walls of the chamber. As the pressure builds up (as high as 60,000 pounds per square inch or more in a rifle), the outer walls of the case press tighter and tighter. The more pressure, the better the seal (up to a point, of coarse). The primer, held securely at its outer walls by the same pressure, and pressing against the bolt face (assuming we're still talking about a rifle), does its part to seal the breach, even though its primary job is completed by this time.
As the bullet speeds down the bore, the pressure begins to drop. Finally, the bullet clears the muzzle and the pressure abruptly drops to zero (in fact, to atmospheric pressure). The cartridge case, having done its job to seal the chamber, has more "work" to do. It must spring away from the chamber walls so it may be extracted. If it does not, it will be a b*tch to remove from the gun. If it fails to spring back from the chamber walls sufficiently, it will seem to be a little "sticky". If it does not spring back at all, it will take the hot hammers of hell to remove it.
In order for the cartridge case to perform its tricky tasks again and again, it must have its properties restored from time to time. One of these properties is its physical dimensions. These are restored each time the case is resized. When a cartridge case is full-length resized, every dimension except the overall case length is restored. Principally, the diameters of the case and the case's shoulder are restored.
Sometimes only the case neck is resized to original factory dimensions. This is due to the fact the cartridge brass has a certain resiliency and is able to spring back to a size which approximates its original size. It will still fit into the chamber of the gun it was fired in, but it may not fit in another gun, which to all intents and purposes is "identical" in every respect, except that its chamber may be slightly smaller. As long as the cartridges are used in the same gun after each neck sizing, no trouble will be encountered. Ammunition loaded from brass which has been neck sized only, may group appreciably tighter. I say may, because there are so many variables that only you can determine which is the best combination of components, processes and techniques for your gun.
Each time the case is fired and reloaded, changes occur in its structure. Except for the obvious changes in dimensions, these changes are not discernable to the naked-eye. The important changes occur at the molecular level in the brass itself.
Properties of Cartridge Cases
A finished cartridge case is made so that the hardness of the metal varies over its length. It must be "hard" in some places and "soft" in others. In order to make brass hard, it must be "worked" or, in a crude sense, "hammered".
Most metals "work harden" as they are formed, and brass is no different. The term "work" means that the fine granular structure of the metal is placed under stress and changes as a result of forming or shaping. These stresses remain in the metal in the form of changes to its grain structure. (This is somewhat oversimplified, but is accurate as far as it goes).
The metallic "grains" can actually be seen if the brass is etched in an acid solution and examined under a microscope with the proper lighting conditions--obviously a laboratory job, and not a subject which I will take up here. When the grains become too fine, the metal will easily crack. However, there are ways to discern the general condition of the metals structure without a laboratory examination.
The cartridge case, as it comes from the factory, is not one single hardness over its entire length. The neck, which must hold the bullet in place with sufficient holding power to prevent its setback while undergoing recoil (as it is stored in a magazine or clip), is somewhat "soft" compared to the head of the case.
By "soft" I do not mean to imply that it is like "dough" or soft like an aluminum beer can. It is "soft" only in comparison to the head of the case. On the other hand, the head of the case is not "hard" like a ball bearing is hard--it is only "hard" enough to do its job and no more. If it is too hard or soft, in the wrong places, the cartridge case will fail, and your first indication of this disaster may be a cloud of gun parts flying in into your face. Such a rapid disassembly of a gun is usually attributed to "an overloaded cartridge," but just as well be from a normally loaded cartridge (developing normal pressures) whose case failed rather catastrophically, and, I might add, rather suddenly, because it had lost its necessary properties.
How hard is "hard", and how "soft" is "soft"? It is not a question which is easily answered, and I will waffle a bit during the explanation. Normally you will use a cartridge case until it is no longer serviceable because of two main reasons: the case necks will become too thin from repeated sizing and trimming operations, or the necks start splitting. In the first case, you will probably detect the thinning by simply looking at the case necks. Your experience will tell you that they are not "right" and that it is time to get a new batch of brass. In the second case, you will spot the split necks as soon as they are extracted from the gun, or possibly during some inspection step during reloading.
If there are only a couple of splits in a batch of brass, you will begin watching it closely (as the neck splits are not particularly dangerous) and occasionally (and unconsciously) touching your wallet as you contemplate the purchase of a new batch of brass.
The reason for the case-neck splitting is that the necks have become too hard and are not able to take the expansion and contraction accompanying the rapid pressure excursion which occurs within the case when it is fired.
 Case-neck thinning occurs when the cases are repeatedly resized. Each time the case is run into the sizing die, it is squeezed back to its original dimensions--moved from one dimension to a smaller one. As the brass is squeezed back to its original dimensions, it's work hardened even more. Each trip through the chamber and resizing die adds to the work hardening of the necks. The usual method of correcting this is to anneal the case necks only. Case-neck thinning occurs when the cases are repeatedly resized. Each time the case is run into the sizing die, it is squeezed back to its original dimensions--moved from one dimension to a smaller one. As the brass is squeezed back to its original dimensions, it's work hardened even more. Each trip through the chamber and resizing die adds to the work hardening of the necks. The usual method of correcting this is to anneal the case necks only.
You might assume that brass is brass and that a little heat can't possibly hurt anything. After all, the heat in the chamber is actually hot enough to melt steel, isn't it? Yes, it is. But, the "fire" and attendant heat are of such short duration that the brass is virtually unaffected. In order to change the grain structure, TIME (as well as temperature) is critical. After too much heat and/or too much time, the brass will be over-annealed. It will be too soft, and the entire case will be affected.
Optimal Case Temperatures for Successful Annealing
Brass is an excellent conductor of heat. A flame applied at any point on a case for a short time will cause the rest of the case to heat very quickly. There are several temperatures at which brass is affected. Also, the time the brass remains at a given temperature will have an effect. Brass which has been "work hardened" (sometimes referred to as "cold worked") is unaffected by temperatures (Fahrenheit) up to 482 degrees (F) regardless of the time it is left at this temperature. At about 495 degrees (F) some changes in grain structure begins to occur, although the brass remains about as hard as before--it would take a laboratory analysis to see the changes that take place at this temperature.
The trick is to heat the neck just to the point where the grain structure becomes sufficiently large enough to give the case a springy property, leaving the body changed but little, and the head of the case virtually unchanged.
If cases are heated to about 600 degrees (F) for one hour, they will be thoroughly annealed--head and body included. That is, they will be ruined. (For a temperature comparison, pure lead melts at 621.3 degrees F).
The critical time and temperature at which the grain structure reforms into something suitable for case necks is 662 degrees (F) for some 15 minutes. A higher temperature, say from 750 to 800 degrees, will do the same job in a few seconds. If brass is allowed to reach temperatures higher than this (regardless of the time), it will be made irretrievably and irrevocably too soft.
Brass will begin to glow a faint orange at about 950 degrees (F). Even if the heating is stopped at a couple of hundred degrees below this temperature, the damage has been done--it will be too soft. From this discussion we can see that there are four considerations concerning time and temperature:
1. Due to conduction, the amount of heat necessary to sufficiently anneal the case neck is great enough to ruin the rest of the case.
2. If the case necks are exposed to heat for a sufficient period of time, a lower temperature can be used.
3. The longer the case necks are exposed to heat, the greater the possibility that too much heat will be conducted into the body and head, thereby ruining the cases.
4. The higher the temperature, the less time the case necks will be exposed to heat, and there will be insufficient time for heat to be conducted into the body and head.
You can see that there are a couple of Catch-22s involved in this annealing business. On the one hand, the brass conducts heat quite rapidly, and a fairly high temperature with sufficient time must be attained to do the job. On the other hand, too much time cancels the effect, and we will be left with a case that is too soft and not suitable for anything but scrap. Obviously, there must be a solution; otherwise, not even the cartridge manufacturers could do it right.
 Automated Annealing Automated Annealing
To solve the problems of automatic case annealing, we need to accomplish the following tasks:
1. Control the time the case neck will be heated.
2. Control the amount of heat delivered to the case neck.
3. Revolve the case at a constant rate (during heating) so that heat is applied evenly around the neck.
4. Prevent, or sufficiently limit, heat conduction into the case head.
Add to the above list the additional frills listed below, and you'll be in hog heaven:
5. The annealer must be easy to set up.
6. The annealer must be simple and easy to maintain.
7. The process must be "dry"--that is, the brass should not become wet and have to be dried before reloading.
8. The annealing process must be easy. It must not require expensive testing equipment or unusual skills and knowledge.
9. The annealing process must be fairly quick. The machine operator should be able to anneal several hundred cases per hour.
10. The process must be repeatable and predictable. Cases must be uniform from case to case, as well as from session to session.
Over-Annealing and Under-Annealing
When cartridge brass is under-annealed, virtually nothing has changed. If your case necks have become work-hardened, they will remain work-hardened, You will not see any improvement in case life or in accuracy. You will assume (incorrectly) that annealing is a waste of time. (In this case, with under-annealed brass, it is.)
Over-annealing is certainly the worst condition, and can even be dangerous, as pointed out above. Over-annealing has two aspects: over-annealing of the case neck only, and any annealing of the lower half of the case. There is no particular danger to over-annealing the case necks, which is the usual result of standing the brass in water and heating the necks with a torch. All that will happen is that your accuracy will not improve, or it may become worse, and the cases may seem to be a little more sticky during extraction. Case life will be improved because the necks are soft--too soft. However, you will conclude that annealing is not what it is cracked-up to be, and may even be a waste of time.
Any annealing whatsoever of the cartridge base is over-annealing and is dangerous. This area of the brass must retain the properties it had when it left the factory. If it is made the least bit softer, let alone "dead" soft, the stage is set for another shooter's nightmare. At the very least, you may get a whiff of hot gas directed toward your face. At the worst, you can be seriously injured as your gun behaves more like a hand grenade than a firearm.
I once heard a tale of a gentleman who placed his brass on a cookie tray and placed the whole batch in an oven at 650 degrees for over an hour. He wasn't hurt--at least seriously. His attitude toward annealing is very negative.
Cartridge brass which has been annealed over its entire length will exhibit signs of excessive pressure even with moderate and reduced loads. Indeed, cases in this condition are subjected to excessive pressures. Any pressure is excessive. Head separation, incipient head separation, stuck or sticky cases, blown primers, swollen cases, swollen case heads, enlarged primer pockets (I mean REALLY enlarged), and just about every other sign of excessive pressure imaginable can occur with cases which have been annealed over their entire length.
Testing Cartridge Brass for Hardness and Softness
This is not a definitive test of case hardness; it is more of an illustration than anything else. It requires a pair of small Vise-Grips and a few bottle neck rifle cases in various conditions of use: a factory fresh empty case, two cases that have not split but have been fired many times, and a couple of extra cases to set the jaws of the Vice Grips.
Place one of the used cases base down in a shallow tray containing water up to the lower third of the case, and deliberately over-heat the case neck--bring it to a red heat.
Adjust the Vise-Grips until the jaws barely touch the case neck when they are fully closed. Then, Carefully adjust them to go a few thousands of an inch beyond that point. the jaws should close until you can just barely visibly detect that the case mouth is deformed when the Vise-Grips are closed.
Ordinary pliers are not good for this demonstration because it is too easy to go too far. Vise-Grips, on the other hand, have an adjustable limit to which they can be closed.
Squeeze the neck of the used, but un-annealed case. Note the pressure required. Also note that when the pressure is released, the case neck springs back to its original shape.
Squeeze the neck of the factory fresh case. Once again note that the case neck springs back to its original shape, and that it takes slightly less pressure to deform it than the un-annealed case.
Now, squeeze the annealed case. The pressure to deform it is markedly less and when it is released, the case mouth remains deformed--no spring.
One more test--stand the annealed case on a metal plate (no water over the base) and heat the upper half to a red heat. Hold the heat for a few seconds and then let it cool. Adjust the Vice-Grips so that they can put considerable squeeze on the head area and crush the annealed case. Now crush one of the normal used cases. The difference is dramatic. Don't test an over-annealed case in a gun just to see what happens--take my word for it, the results can be dangerous to life, limb and eye, not to mention the condition of the gun. Finally, crush all test cases so that they won't get mixed in with good brass.
If you are a chemist or a metallurgist and know how to do it, you can make some photomicrographs of sections taken from the various critical points of several cases for reference. Of coarse, you could have been out on the range having a good time instead of fussing with such things, but to each his own.
Preparing the Brass for Annealing
The brass does not require any special preparation before it can be annealed. However, you will need a few polished cases in order to determine the correct temperature. This is important if you want first class results. If your first batch of brass will be pistol brass, don't use plated cases for the testing. Plated cases anneal just fine, but you will not be able to see the color of the brass as it heats up under that shiny coating of nickel.
If you have a polisher, polish the brass before annealing it. If you do not have a polisher, use a little Brasso or other brass polish on a dozen or so cases Polish them about half way down the case by putting a little Brasso on a soft cloth and turning them by hand. If you have a polisher, I don't need to tell you how to polish the brass.
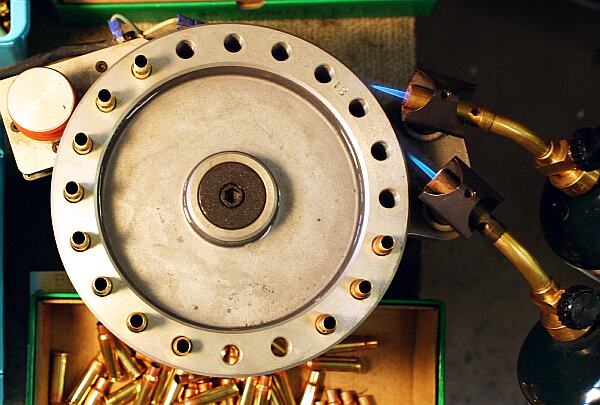
| Working with the BC 1000 Automatic Case Annealer |
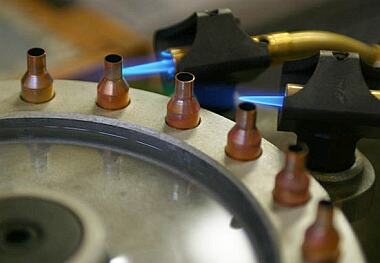
 The BC 1000 is an automated, carousel annealing machine that can process 1000 cases per hour. Sold by Ken Light Manufacturing, it retails for $325, with a single shell-holder ring ("shell wheel"), but without propane tanks or burner tips. Shell wheels come in four thickness: 0.5", 0.75", 1.0", and 2&;quot; (for 50BMG). Extra rings up to 1" thick cost $42. For a 6PPC or 6BR, the three-quarter inch thickness shell wheel is recommended. Before we go any farther in describing the operation of the BC 1000, please heed this warning: The BC 1000 is an automated, carousel annealing machine that can process 1000 cases per hour. Sold by Ken Light Manufacturing, it retails for $325, with a single shell-holder ring ("shell wheel"), but without propane tanks or burner tips. Shell wheels come in four thickness: 0.5", 0.75", 1.0", and 2&;quot; (for 50BMG). Extra rings up to 1" thick cost $42. For a 6PPC or 6BR, the three-quarter inch thickness shell wheel is recommended. Before we go any farther in describing the operation of the BC 1000, please heed this warning:
Make Sure There Are NO Live Primers or Charged Cases in the Annealer!!
Place one of the polished cartridge cases in a hole near the flame and let it go around the wheel and drop out. This will take a few seconds so be patient. If you are using a rimmed, semi-rimmed or belted case, it will have to be fed from the bottom of the shell wheel and held until the base can be dropped on the feed ramp. Rimless and rebated cases can be fed from the top.
It should be noted that one of the purposes of the shell wheel is to preheat the case as well as provide a heat sink to keep them from being over-heated. (The center of the BC 1000 is a chamber filled with hot water; this liquid both pre-heats the cases and serves as a heat-sink.) All cases should be fed into the shell wheel in the area of the feed ramp. Starting the cases too close to the flame will not give them time to preheat to 212 degrees (F).
On a bottle-neck rifle case, the central portion of the flame should be on the case neck, and the outer portions of the flame will "wash" over the shoulder and down the side of the case for a short distance. As the cartridge goes around the wheel, it will turn, causing the entire periphery of the neck to be exposed to the direct flame at one time or another.
With this setup, the neck will actually reach a temperature between 750 and 800 degrees. Remember, it's the combination of time AND temperature that does the job. We have raised the temperature sufficiently to be able to anneal the case necks in 6 to 8 seconds.
The shoulder will be a bit cooler than the neck, and the body cooler yet. The case head will be below 300 degrees (F), which is well below the critical temperature of 482 degrees (F) at which the first changes in grain structure can occur.
As the case progresses through the flame, watch it closely. You will detect a slight--barely perceptible--change in color. As the exits the flame, there should be a light bluish color which develops at the shoulder or a little below it, while the shine remains on the case body. The loss of the shine is a clue that the case got a little too hot. On bottle-necked cases you will find that the neck turns to a noticeably deeper "gold" color.
If the shine is gone, the flame can be adjusted or the angles of one or both torches can be changed so the case is not in the flame as long. The height of one of the torches may be changed so that the cases are not in the hottest part of the flame. The color will usually develop as the case is in the last flame.
If the cases do not develop any color at all, then increase the intensity of the flame or adjust the flames so that they play more directly on the case necks, or a combination of the two.
In any case, you are very much more likely to over-anneal than to under-anneal.
Do not expect that the color will be as dark as it appears on military cases. This darkness of the color on military cases occurs over a period of time, as do the delicate reds and purples around the dark color. If you leave one of your cases sitting out for a few months, it will begin to take on the same appearance that military cases have.
If the cases have lost their shine, they were close to a red heat and may or may not be too soft. You can gauge the softness to some degree by using the Vise-Grip "test" described above. If the case mouth doesn't spring back after being slightly deformed, the case is trash. Don't waste your time with it.
When you get the faint blue color and the shine remains on the case, you have everything adjusted to perfection. Start stuffing those little brass cases in those little round holes until you're done. Make mental notes of your set-up, and you'll be able to repeat it in about three minutes the next time you anneal.

Selecting the Proper Torches
Almost everyone has a propane torch. They are pretty handy gadgets to have around the house. You will need two of these torches for the BC 1000 Cartridge Case Annealer. Before you go out and buy another torch or two, we need to have a brief discussion on torches. There are torches, and then there are torches.
Some of the older type torches have large burner tips and very crude fuel control systems. Most of the newer torches have very efficient tips and fuel valves that are quite precise. The newer torch tips are small in diameter--about 1/2 inch--while most of the older models are in the 5/8ths inch range. There is nothing wrong with the older style torches, and you will find that they can perform quite well. However, if your torch's flame is hard to control, the tip "spits" or "flares", or the tip has become too deformed because of being dropped a few times too often and no longer delivers an even flame, some new torches may be in order. I happen to favor the BernzOmatic Model JTH-7 torch. The tip is efficient, and the valve is not too sensitive. Any equivalent torch will do nicely as long as the tip will fit through the torch holder. This torch will deliver about 4200 BTU.
When To Anneal
OK, now that you know how to anneal, you need to know when to anneal. If you shoot light loads, you can go a long time between annealing. Moderate loads will necessitate annealing a little more often. Normal loads will work harden the case after an amazingly short time. Hot or maximum loads will require annealing very often--something on the order of once after every two to four firings.
You must also consider that some work-hardening occurs when the brass is resized, so the number of firings do not tell the whole story. Another consideration is the chamber size of your gun. If you have a "loose" chamber, you will expand your brass more. It will need to be squeezed more when it is resized, thereby causing it to be worked a little more than "normal".
Another indicator is the opening up of your groups. When you start getting fliers and abnormally large groups, check your case necks along with all of the other variables; it may be time to anneal. If you're a chemist or metallurgist, you could acid-etch a case neck and microscopically inspect the grain size.
In the end, it will be your own experience that will determine the proper frequency of annealing--just like every other aspect of handloading, there are many variables which are peculiar to your particular problems, methods, techniques, loads, components and guns. You are the final judge.
The next question is, should cases be annealed before reforming? I will let Mr. Earl Naramore answer that Question ("Principles & Practices of Reloading", Small Arms Tech. Publ. Company, 1954):
"As to whether cases should be annealed prior to re-forming them to some wildcat shape, much depends upon circumstances. Re-forming such cases in an ordinary resizing die puts a crushing force on them and I fear that if this cock-eyed method is used, the annealing would only make the crushing of the cases easier. But if a preliminary break-down die is used, there would probably be an advantage to annealing before the re-forming is done; it depends on the force of the break-down die, the nature of the case, and such.
If cases are annealed for re-forming, the angle of the flame should be set back and it should be carried to a point where the shine on the cases disappears. Following the annealing, the cases should be polished again outside before any sizing is done on them. The loss of shine means that the surface is oxidizing and such a surface will give excessive resistance in a die."
If you are forming brass and have definite instructions as to when, where and how much to anneal, by all means, follow the instructions that you have been given. The "instructions" above are more in the form of "guidelines" rather than definite instructions.
The last question is, "Do I anneal before resizing, or after"? Theoretically annealing does not change the diameter of the case neck. In practice, it may or may not, depending on how much the metal is stressed. Therefore, you should always anneal before resizing.
About the Authors
 Jim Harris has won several NRA National and IHMSA International championships in metallic handgun silhouette competition. He is also active in High Power Rifle Silhouette and Black Powder Cartridge Silhouette. In the silhouette arena, he helped popularize the 6.5BR, 6.5PPC, 6.5TKS (improved BR), .260 Remington and .22 PPC, and pioneered the use of Vihtavuori powders in the mid-90s. Jim is a published author in the Vihtavuori Reloading Manual, Precision Shooting magazine, the IHMSA News, The National Silhouette Report, and other publications. Jim, based in Southern California, is also a successful professional freelance photographer, specializing in commercial photography and architecture. Contact Jim at JimHarrisPhotography.com. Jim Harris has won several NRA National and IHMSA International championships in metallic handgun silhouette competition. He is also active in High Power Rifle Silhouette and Black Powder Cartridge Silhouette. In the silhouette arena, he helped popularize the 6.5BR, 6.5PPC, 6.5TKS (improved BR), .260 Remington and .22 PPC, and pioneered the use of Vihtavuori powders in the mid-90s. Jim is a published author in the Vihtavuori Reloading Manual, Precision Shooting magazine, the IHMSA News, The National Silhouette Report, and other publications. Jim, based in Southern California, is also a successful professional freelance photographer, specializing in commercial photography and architecture. Contact Jim at JimHarrisPhotography.com.
 Ken Light owns and operates Ken Light Manufacturing. A skilled designer and machinist, Ken has created a variety of unique products for shooters. His company specializes in products for Int'l Handgun Metallic Silhouette Association (IHMSA) and NRA Hunters Pistol Metallic Silhouette competitions. Ken started shooting silhouette in 1986 and has won seven (7) National Championships. Ken works with many of the top silhouette shooters to improvise and develop new products. In addition to the featured BC 1000 Automatic Case Annealer, Ken's company offers sight ribs, high rise mounts, extension mounts, triggers, metallic sights, blast shields, and accessories. Contact: Ken Light Mfg., Lake Havasu City, AZ, Phone: (800) 790-3184. Ken Light owns and operates Ken Light Manufacturing. A skilled designer and machinist, Ken has created a variety of unique products for shooters. His company specializes in products for Int'l Handgun Metallic Silhouette Association (IHMSA) and NRA Hunters Pistol Metallic Silhouette competitions. Ken started shooting silhouette in 1986 and has won seven (7) National Championships. Ken works with many of the top silhouette shooters to improvise and develop new products. In addition to the featured BC 1000 Automatic Case Annealer, Ken's company offers sight ribs, high rise mounts, extension mounts, triggers, metallic sights, blast shields, and accessories. Contact: Ken Light Mfg., Lake Havasu City, AZ, Phone: (800) 790-3184.
|
| Editor's Tool Tips: Case Holders for Manual Annealing
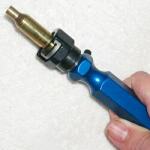 As the main article explains, there are a variety of manual annealing methods. One method secures the brass in a case-holder. At right is a 6BR case in the K&M case holder (normally used during neck-turning). The case-holder acts as a heat sink to absorb some of the heat at the bottom of the case. Rotate the case-holder with your fingers, spinning the case through the flame. With the K&M tool, you can remove the handle and chuck the case-holder's "tail" in a variable-speed drill or an electric screw-driver (middle photo). Electric screwdrivers wobble a bit more than drills, but they are lighter and more convenient. As the main article explains, there are a variety of manual annealing methods. One method secures the brass in a case-holder. At right is a 6BR case in the K&M case holder (normally used during neck-turning). The case-holder acts as a heat sink to absorb some of the heat at the bottom of the case. Rotate the case-holder with your fingers, spinning the case through the flame. With the K&M tool, you can remove the handle and chuck the case-holder's "tail" in a variable-speed drill or an electric screw-driver (middle photo). Electric screwdrivers wobble a bit more than drills, but they are lighter and more convenient.
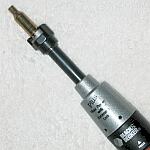 The biggest problem with using a K&M-type case-holder is removing the case (you want the brass to be secure, but not too tight). That can take a few seconds, so it may be best to quench the case (in your quenching bucket) before removing it from the case-holder. Then, after the brass has cooled, you can easily slide the case out with your bare fingers. If you have a drill with a large half-inch chuck, you can place the case directly in the mouth of the chuck, leaving just the neck/shoulder area exposed. The big chuck acts as a very effective heat-sink. We recommend a variable speed drill for this method. It also works best if you have a quick-release chuck. The biggest problem with using a K&M-type case-holder is removing the case (you want the brass to be secure, but not too tight). That can take a few seconds, so it may be best to quench the case (in your quenching bucket) before removing it from the case-holder. Then, after the brass has cooled, you can easily slide the case out with your bare fingers. If you have a drill with a large half-inch chuck, you can place the case directly in the mouth of the chuck, leaving just the neck/shoulder area exposed. The big chuck acts as a very effective heat-sink. We recommend a variable speed drill for this method. It also works best if you have a quick-release chuck.
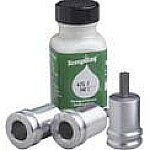 Hornady sells an "Annealing System" (item 041220, about $35) with three case-holders for large, medium, and magnum cases, plus a bottle of Tempilaq. (Note: Use 650-750° rated Tempilaq, not the 475° rated bottle supplied with some kits). The case-holders are bored slightly oversize, so it is easy to insert the cases or remove them using gravity alone. Kory Hamzeh reports: "I've tried a lot of different annealing methods and the best results have been with the Hornady case-holders. I use an electric screwdriver to spin the case-holders, which fit loosely on the brass. When I hit the right temperature, producing a very dull glow in a dark room, I can just tip the screwdriver and the annealed case falls right out into my water bucket." Hornady sells an "Annealing System" (item 041220, about $35) with three case-holders for large, medium, and magnum cases, plus a bottle of Tempilaq. (Note: Use 650-750° rated Tempilaq, not the 475° rated bottle supplied with some kits). The case-holders are bored slightly oversize, so it is easy to insert the cases or remove them using gravity alone. Kory Hamzeh reports: "I've tried a lot of different annealing methods and the best results have been with the Hornady case-holders. I use an electric screwdriver to spin the case-holders, which fit loosely on the brass. When I hit the right temperature, producing a very dull glow in a dark room, I can just tip the screwdriver and the annealed case falls right out into my water bucket."
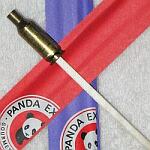 Another simple method to secure a case is to use a small wood dowel or chop-stick, fitted into the primer pocket. (Panda Express Chop-sticks fit perfectly in a 6BR case--no trimming needed.) Obviously, this only works if you remove the spent primers first. One nice thing about using a dowel or chopsticks is that the wood won't conduct heat to your fingertips the way a metal shaft can. Also, it is very easy to release the annealed case. Just put the case rim over the lip of your water-quenching pan, pull back and the case should slip right off. The downside of using a dowel or chopstick is that you have no heat-sink, so it is easier to overheat the entire case, ruining it. Another simple method to secure a case is to use a small wood dowel or chop-stick, fitted into the primer pocket. (Panda Express Chop-sticks fit perfectly in a 6BR case--no trimming needed.) Obviously, this only works if you remove the spent primers first. One nice thing about using a dowel or chopsticks is that the wood won't conduct heat to your fingertips the way a metal shaft can. Also, it is very easy to release the annealed case. Just put the case rim over the lip of your water-quenching pan, pull back and the case should slip right off. The downside of using a dowel or chopstick is that you have no heat-sink, so it is easier to overheat the entire case, ruining it.
Finally, some people to prefer to hold the case with their fingertips. In time you develop a "feel" for the proper temperature--or so the story goes. We don't recommend this method because you'll probably ruin quite a few cases, and potentially fry your fingertips, before you get it right. If you do use the fingertip method, use a temp marker on the necks of your cases. Available in solid or liquid form, in variety of temperature ranges (melting points), temp markers change neck appearance when you reach the set temperature (see sidebar). |
| DeSimone Explains Annealing with Powered Case-Holder
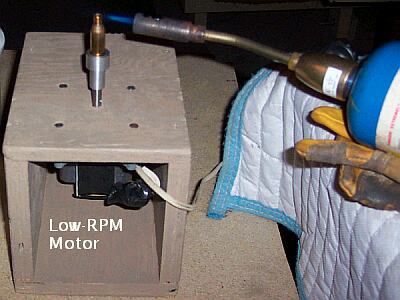
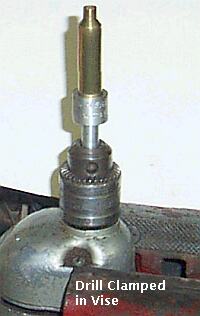
Successful long-range shooter Rich DeSimone, who holds the 5-shot IBS 1K world record, advocates frequent case-annealing: "On my 1,000-yard cases, I anneal every firing. Probably every other would suffice, but it takes so little time that I do it every time" He anneals one case at a time, but he uses a home-built powered case turner. He assembled a wood box, to which he fitted an $8.00, surplus electric gear reduction motor running at 60 RPM. The motor spins a case-holder he crafted. Prior to building this box, Rich simply chucked his case-holder in a portable electric drill clamped in a bench-vise. With either set-up, cases are secure, yet easily removed--even while spinning. The powered case-holder frees up one hand and speeds up the process considerably.
 Rich tells us, "I use Charles Bailey's annealing method. Charles was the 2001 IBS 1,000-yard Benchrest Shooter of the Year. Charles and I shoot together at Hawk's Ridge in NC. Rich tells us, "I use Charles Bailey's annealing method. Charles was the 2001 IBS 1,000-yard Benchrest Shooter of the Year. Charles and I shoot together at Hawk's Ridge in NC.
I've turned a small piece on the lathe to hold the cases, either for my powered wood annealing box, or my variable speed drill. (If you use your imagination, you can easily make something similar that will work.) The case sits freely in the case-holder, which is reemed slightly oversize, so it's easy to insert/remove the case. I also cut a step in the case-holder cup so I can use cases with both large and small rim diameters. The motor drive in the box runs at 60 RPM. When I used the drill, I set the speed to around 100 RPM, using a rheostat. RPM isn't critical--you just don't want the case flying out of the fixture, but it does need to turn so the heat is evenly distributed.
 While annealing, I turn off the lights except for a small one off to my left which I keep shielded from my eyes. I have a glove on my left hand and I control the torch with my right hand. You want the blue tip of the flame to just touch the neck of the case as it turns. I keep the flame up pretty high. With 6.5-284 AI cases, it takes about six to seven seconds. Watch for the neck to "jussst" start to turn maroon in shade. In other words, watch for the very onset of the neck changing to red. (You'll catch on with a little practice.) At this point, I grab the case near the base with my gloved left hand, lift it from the spinning case-holder and drop it in a bucket full of full-strength CLR (Calcium/Lime/Rust solvent). Then, with the fixture still turning, I grab another case with my gloved left hand, insert the case in the turning fixture, and repeat the process. While annealing, I turn off the lights except for a small one off to my left which I keep shielded from my eyes. I have a glove on my left hand and I control the torch with my right hand. You want the blue tip of the flame to just touch the neck of the case as it turns. I keep the flame up pretty high. With 6.5-284 AI cases, it takes about six to seven seconds. Watch for the neck to "jussst" start to turn maroon in shade. In other words, watch for the very onset of the neck changing to red. (You'll catch on with a little practice.) At this point, I grab the case near the base with my gloved left hand, lift it from the spinning case-holder and drop it in a bucket full of full-strength CLR (Calcium/Lime/Rust solvent). Then, with the fixture still turning, I grab another case with my gloved left hand, insert the case in the turning fixture, and repeat the process.
It works very well. I can do 50 cases in about ten minutes. I then let the cases sit in the CLR for an hour or two, then rinse several times and brush out the necks with a RCBS nylon case-neck brush. Make sure you have enough CLR in the bucket for the cases to be fully covered or you will get some marks. Remove spent primers before annealing so water will flow through the cases when you rinse and dry them. As far as drying--I just dump them on a big towel and roll them "to and fro". You can just let them air-dry or use a hair dryer to speed the drying process. Sometimes I'll hit them individually with compressed air, then use my heat gun to apply some heat. Overall the procedure may seem complicated, but once you get the hang of it, it's a piece of cake. — Rich DeSimone — |
Did You Enjoy This Article? Please Consider Making a Small Donation:
BC 1000 and brass photos Copyright © 2005 Jim Harris, All Rights Reserved. Original text Copyright © 2005 Jim Harris and Ken Light, All Rights Reserved. All other content, and layout, photos Copyright © 2005 6mmBR.com, All Rights Reservred. No reproduction without express permission in writing.
Topics: Anneal, Annealing, Annealer, BernzOmatic, JTH-7, Propane, BC1000, BC-1000, BC 1000, Carousel, Turntable, Shell Wheel, Automatic Annealer, Brass, Propane, heat, Fahrenheit, Temperature, Celcius, Gas, Temp, Neck, Case-neck, Neck-Tension, Tension, Heat, Heater, Flame, Burn, Cartridge, Reloading, Jim Harris, Ken Light, Ken Light Manufacturing, 6BR, 6PPC, Precision Shooting, Precision, Reloading, Case-Forming, Case Prep, Lead pot, Annealing Tool, Rifle, Benchrest, Silhouette, IHMSA, International, Handgun.


|

