Every shooting system is a system of dynamics that must all work together to produce as close as possible the same results each time you pull the trigger...aka...accuracy.
Each system requires its own set of basic remedial steps to make it work. Bolt actions, for example, must of course have decent triggers, must have things trued and squared, must have locking lugs bearing evenly, action not bent by the stock bedding, etc. All of these issues are well above and beyond what you get from out of the box production guns.
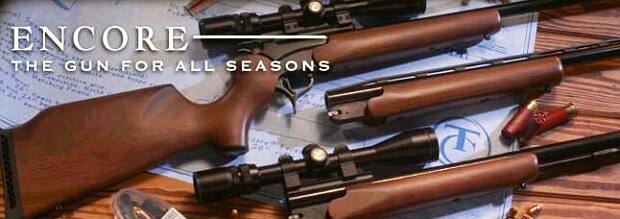
That said, the Encore is no different from other production guns. Buried beneath the surface is a fantastic trigger and excellent accuracy potential. Whether the Encore has a $200 used factory barrel on it or a top notch $500 plus custom barrel on it, here are the basics that must be done to the system to get the best from it.
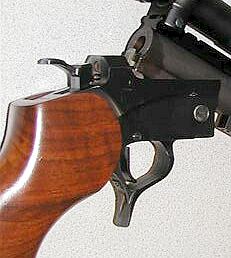
1) Tighten up the hinge pin area and lock up. You would not accept a bolt gun with a barrel that shakes and rattles on the receiver, so why would you expect a loosely fitted barrel to shoot its best on a break open gun? Use an oversize hinge pin that is an “interference fit” and a stronger locking bolt spring to engage the locking bolts more securely in the frame, thus pulling the barrel down tighter into its seat in the frame.
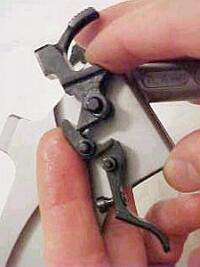
2) The trigger. The TC Encore (and smaller framed version, the G2) have some of the smoothest triggers of any firearm made once the required smoothing up is done. For most applications, we suggest stopping at 1 1/2 pounds for the lightest recommended pull weight, but done correctly, they can be taken down to about 12 oz using our trigger springs and instructions. We encourage everyone to try their own hand at doing trigger jobs on these frames, but we also do the complete action/trigger job for those who don’t want to approach it or do not get quite the level of pull they want. FREE download Encore and G2 Trigger Job Instructions available on www.bellmtcs.com
3) Lock time and reliable ignition. The factory hammer springs are minimally up to the job of lighting primers. If you have excess headspace, shorten the hammer spring any to make it rebound reliably to half cock in conjunction with a lighter trigger/sear spring and lighter pull weight, add weight to the hammer with a hammer extension (which TC categorically condemns the use of), or are shooting hard to light primers, you must use a heavier hammer spring. And of course, a heavier hammer spring speeds up lock time even if there is no hammer extension installed.
Speaking of hammer extensions, in spite of what the factory says, they are essential for getting a positive, safe “purchase” on the hammer cocking it. However, the Encore’s hammer is of rather frail design. The waist of the hammer in front of the spur is very thin and will often break off, especially if a heavy steel hammer extension is used and/or the gun is dry fired much. The impact of the hammer hitting the back of the frame tends to bend the spur up and forward until it breaks off. Over-tightening the set screw trying to keep the extension from sliding forward can also result in bending the hammer spur up when it is installed on the right side of the hammer, and we have seen spurs bent downward, also, when installed on the left side. Bottom line regarding hammer extensions: Go light. Use aluminum, not steel. Use a design that stops the extension from sliding forward by some other means than just set screw pressure on the side of the hammer like the vast majority of those on the market.
4) Headspace. These guns are different from bolt actions, and what works with sterling success in bolt guns can be poison to success with the break open guns. Cases too short, ie, excess headspace, ruin accuracy mostly due to the erratic ignition created by having to drive the case forward in the chamber before it comes to a stop and the firing pin does its work. Likewise, cases that stick out too far a) interfere with complete lockup of the barrel in the frame, and b) put an inconsistent preload on the frame on a vertical plane that often rears its ugly head in the form of vertical stringing of shots. Need I tell this audience that ammo that fits right tends to work right?
But, what works in bolt guns whose breech faces are inline with the axis of the bore and whose great camming power is a real plus with positive pressure on the bolt face does not apply in the break open guns.
With these break open guns, light loads and neck sizing or partial full length sizing will work for some folks some of the time, but more often than not produces problems. Thus, if someone says they are not able to cock the hammer or are getting vertical stringing of shots, my tendency is to treat them like a red-headed step son and first ask, “OK. What is your barrel-to-frame gap?” If they cannot answer that question, then they have no clue what their headspace is, either plus or minus.
I recommend the headspace be kept as close to zero as possible without the case head applying any force to the case while closing the barrel. Said another way, shoot for .001” actual headspace. There are several ways to go about this, the best of which is to simply add or subtract how much the case head sits below or above the end of the barrel to the actual gap measurement, as determined with a common feeler gauge set.
Where the case head stops relative to the end of the barrel is measured with the barrel OFF the frame, once the barrel-to-frame gap is established.
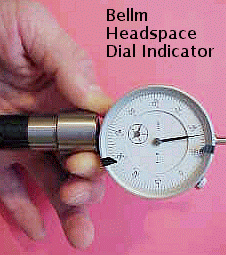
Everyone shooting break open guns will sooner or later find that solutions to unavoidable problems come from understanding and managing headspace, and thus FULL LENGTH size die adjustment, to produce the correct shoulder to headstamp dimension and thus the correct distance from the headstamp to the breechface. Measurements must be taken, and the most precise, easiest way to take those measurements is with the Bellm Headspace Indicator, instructions for which are on our online store.
A depth micrometer can also be used for this purpose but after 26 years juggling depth micrometers on case heads, my depth micrometer now has a nearly permanent home in the drawer and seldom sees the light of day. My Headspace Indicator is all I use for determining headspace and cutting chambers to the correct depth to get that headspace.
It also makes error inducing comparators and bullet seating depth gadgets just that, gadgets, expensive and cumbersome gadgets at that. The barrel itself is “the guage.” You take your measurements directly from it with the indicator.
Short course on determining bullet-to-rifling contact point and distance to breech face. Size your cases to produce .001” headspace. Seat a bullet long so the case sticks out of the chamber more than what produces .001” headspace, then tweak the bullet deeper into the case until the case head returns to its empty case only amount of protrusion from the end of the barrel. You will now have EXACTLY produced the throat contact-to-breechface dimension IN YOUR BARREL. No variances due to bullet shape or shape on the ends of the rifling compared to a “comparator.”
5) Forend bedding. Two approaches apply here. If the forend will be used on only one barrel, the consensus is it should be epoxy-bedded with solid contact with the barrel for the entire barrel channel length.
The other approach if it is to be used on more than one barrel is to bed it so it only makes contact for a small area around each forend screw. Hanger bars work sometimes, but have not proven to be bullet-proof solutions to forend bedding.
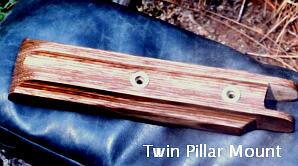
Bedding pillars that are epoxied into the forend to create standoff between the forend and barrel are generally considered to be the most reliable method of bedding. The barrel channel is opened enough for a full float, then the barrel centered in the channel while metal sleeves are installed with the forend screws and epoxied into the forend. When the forend is removed, the sleeves extend up into the barrel channel, again, producing standoff and making the sleeves the only point of contact between the barrel and forend. Some folks allege that the rear “ears” of the forend in contact with the frame can cause accuracy problems and should be given clearance also.
6) and finally we get down to Chamber Throats. This single item is the least understood, least talked about, and most grossly overlooked aspect in the entire system, yet it is the single most important factor to getting that perfect bullet out the barrel and landing in the same vicinity as those before and after it.
The chamber throat is also the one and only dimension in the system that permits compatibility with other components while holding tolerances in the tenths of a thousandth inch since bullet manufacturers hold bullet diameter tolerances in the tenths. Virtually everything else in the system varies all over the place, but bullets are held, by and large, to the closest of all tolerances found in barrel, chamber, and die dimensions.
Yet, on any reamers that are SAAMI spec, the throat diameters are usually at least .001” larger than normal bullet size and as much as .005” larger than bullet size.
Many of the SAAMI throats are conical and have no cylindrical section to them to guide and support the shank of the bullet as it is engraved into the rifling.
Bottom line: A steel cylinder with a gentle leade angle on the ends of the rifling, and one that is CENTERED with the bore, does far, far more to support and guide the bullet straight into the rifling with the least deformation than anything you can do with a thin, flimsy brass sleeve, ie, the case neck...... unless of course that case neck is contained in a zero clearance, tight chamber neck.
Cutting the throat with the finish chamber reamer does not permit holding throat tolerances or alignment since torque forces cutting the body of the chamber cause the reamer to wander off center and to cut somewhat larger than it measures. Floating reamer holders and pilot bushings are not enough to get this alignment and hold tight enough tolerances. The throat must be cut separately, the bore dialed in centered with the axis of the lathe, and the throat diameter kept to an absolute minimum. A long leade angle is also very important, of course.
The above applies to new barrels of course, but has also been my focus for about 25 years reworking factory barrels by cutting longer chambers that cut out the factory throat and permit my Co-Axial throating in fresh rifling forward of the original throat.
A throat lined up with the bore and kept to minimum diameter does more for accuracy than anything you can do with the brass case or the chamber that surrounds it UNLESS you go to costly tight neck chambers and inline dies, the down side of which is the general inability of doing the full length resizing that is required for these break open guns.
7) The crown. This is important with any barrel. However, often crowns that are pathetically out of square with the bore and poorly cut do not seem to interfere with accuracy. But need I say that a cleanly cut crown that is square to the bore is good insurance that a barrel will get its best chance to perform?
When all the basics have been done and the barrel still does not shoot, it can usually be traced to the chamber throat not aligned with the bore.
Most fixed barrel guns can have the barrels set back and rechambered to get the throat aligned with the bore, but with the break open barrels and their lugs welded to them, rechambering to a longer round is the best way to cut out the misaligned throat and permit cutting a new throat ahead of it. The throat is the key.
The economy of just adding an interchangeable barrel to have another gun is a great attraction of the TC Encore and G2 systems, but it is more than just the economy that makes these guns so practical. Given proper attention, they can be highly competitive with the best bolt action and fixed barrel designs in nearly every respect.
Do we like the system? You bet we do, and have devoted our sole attention to it and the like minded shooters we work hard to find solutions for.
Mike Bellm
Bellm TCs, Inc.
www.bellmtcs.com