|
|
|
260 Ackley Case Forming
Smart Methods to Form Cases for the 260 Remington Ackley Improved
EDITOR'S INTRO: Chris Long ("TechShooter") has a tack-driving 260 Ackley Improved rifle. Chris and others have found that "improving" the 260 Rem makes a good cartridge even better in terms of long-range performance. Ackleyizing the 260 allows you to drive the 140-class bullets over 100 fps faster, to 2940+ fps. That velocity rivals what 6.5-284s deliver, at least when tuned for best accuracy. This article explains how Chris fire-forms his brass to create 260 Ackley Improved cases. He covers two forming methods--one with bullets and one without projectiles.
In working with this cartridge, Chris initially started with Remington-brand 260 brass. Because Rem brass was in short supply, and to see if Lapua brass might work better, Chris then tried Lapua .243 Win cases necked up to .264. This worked, but Chris found that doughnuts formed in the Lapua brass. This editor has likewise encountered doughnut problems when necking up Lapua and Norma brass for his 260 Rem. Chris worked out a solution for the doughnuts, which is explained here, but he then went back to Remington-brand 260 brass, both to save time and money. Chris reports the latest batch of Remington brand brass is quite good. |
| Brass Selection and Prep | Fire-Forming with and without Bullets |
Background
The 260 AI rifle project was started after shooting a 6.5-284 for a couple of varmint hunting seasons, with the goal being to equal the larger cartridge's external ballistic performance with less powder, more efficiency, and (hopefully) better barrel life. The initial tests were performed with a end-of-life 3-groove, 1:9" twist Pac-Nor barrel taken off the 6.5-284, then set back and chambered with a 6.5-243 Improved reamer from Dave Kiff at Pacific Tool and Gauge, with the throat length set for the Sierra 142gr MatchKing bullets.
As this project unfolded, a number of lessons were learned regarding brass preparation and methods of fire-forming the Ackley Improved cases, as well as issues induced by using necked-up .243 Lapua brass. Fire-forming the .243 Lapua brass was done using 142 SMK moly bullets, over 47.4 grains Ramshot Hunter, and a GM215M primer. The .243 necks were expanded to 6.5mm using a K&M mandrel before seating the bullets. All cases fire-formed well, with no split necks. I went with the Lapua brass for this experiment due to the lack of availability of 260 Remington brass from Remington, and the great intrinsic consistency of Lapua brass. Accuracy was excellent, at less than 0.5" five shot groups at 100 yards during fire-forming.
After fire-forming, the Lapua cases had 55.9 grains H2O capacity. There was a pronounced doughnut at the neck shoulder junction, thick enough that a bullet would not pass after firing. Using a Starrett hole gage, this doughnut measured 0.005" smaller than the fired neck. A case was sectioned, and the doughnut is clearly visible in the photo below, as well as the slight thickening of the neck walls at the neck shoulder junction.
The throat on the chamber is set so that only the 139 Lapua Scenar will not seat deep enough due to this doughnut. I ordered the reamer with a very short throat, and used a separate 6.5mm throating reamer to get the precise throat depth necessary to clear the doughnut on the longer bullets. The 142 SMK, 123 Lapua Scenar, and the 130 Berger VLD will all seat just back from the lands. A Forster inside neck reamer was used to try and clean up these doughnuts to make it easier to seat the 139s. With the shorter bullets this may not be so critical. [Editors Note: Even if a bullet is not actually blocked by the doughnut, having a thick doughnut at the base of the neck will increase neck tension and provide resistance to bullet seating as you work the bullet further down the neck. For this reason, you may want to cut out the doughnuts even if your shorter bullets are not bumping into them. I found when I cut out the doughnuts, case to case neck tension became much more consistent, and accuracy improved even with the shorter, 120-class bullets.]
The Dreaded Doughnut--Where Does It Come From?
The region of restriction is clearly visible in this picture of a sectioned case, and it is possible to see the slight thickening of the neck walls at the neck-shoulder junction.
 The doughnut you see (at right) is nothing more than brass from the slightly thicker shoulder region of the .243 Win. case that has been displaced into the new lower part of the now 6.5mm neck. Given the 0.297" chamber neck dimension, and the 0.292" diameter of the case neck with a seated bullet, this slightly thicker brass is held to the inside in that region where the neck has been lengthened after firing. The doughnut you see (at right) is nothing more than brass from the slightly thicker shoulder region of the .243 Win. case that has been displaced into the new lower part of the now 6.5mm neck. Given the 0.297" chamber neck dimension, and the 0.292" diameter of the case neck with a seated bullet, this slightly thicker brass is held to the inside in that region where the neck has been lengthened after firing.
All bottleneck cartridges exhibit some amount of brass migration from the shoulder area into the neck after each firing. This makes it necessary to trim the cases to length from time to time. This migration can eventually lead to the formation of doughnuts for some cartridges. Unfortunately, the neck-expanded .243 Win brass starts with this condition, and the doughnuts get worse with each firing.
While probably not the only method, inside neck-reaming can help to remove this doughnut. Forster makes a line of inside reamers, and these can be used with their neck trimming fixture, or in a variety of other ways. Others have reported that a good method is to first size the neck fully using a full-length die, then run in a 6.5mm expander mandrel, stopping just short of the doughnut. This leaves the excess brass of the doughnut on the inside, and makes removal with the insider reamer tool much more effective. Ken Markell of K&M tools stresses that this operation really works best with the full-length die--if you just use a neck-sizing die it won't push the excess brass right at the neck-shoulder junction to the inside. Note that the Forster inside reamers are designed to be used on unsized (fired) case necks, so the step of expanding the neck with the mandrel before reaming should not be omitted. Another option is to use the K&M Carbide Mandrel that has a cutter tip at the end. You use the same procedure as with the Forster inside reamer--Full-length size the case, then expand the neck, stopping just short of the doughnut. Then insert the cutter-tipped mandrel and cut the doughnut out from the inside. |
| 260 Remington Brass Preparation and Traditional Fire-Forming |
Standard Remington 260 brass was used during the initial testing, and 100 cases were screened by measuring the neck wall thickness, and discarding any that exceeded 0.0015" total variation around the circumference of the neck. Out of the initial batch of 100, 83 cases met this criteria. The primer pockets were uniformed with a Haydon carbide uniformer tool, and the flash holes were deburred using a Haydon flash hole tool. The necks were sized in a Lee 260 Remington Collet Die, then inside and outside chamfered. The cases were then primed with Federal 215M large rifle match magnum primers.

Fire-forming was done with the tried-and-true method of seating a bullet past the jam point, with good neck tension, so that the case would be held firmly against the bolt face upon initial firing. The load used was 47.4 grains Ramshot Hunter, under a 142gr moly Sierra MatchKing. This load resulted in velocities around 2950 fps, and accuracy at about 0.5 MOA for 5 shot groups. There were no split necks out of this first batch of cases, and the fired case length was very consistent. The length was measured using a Stoney Point case comparator on a pair of digital calipers, with the length variations under ± 0.001" for all the 83 cases. The brass had a water capacity of 57.4 grains after fire-forming. More importantly, there were no doughnuts formed inside the case at the neck and shoulder junction point.
Switch Barrel Project Rifle--Lapua .243 Win Brass Preparation and Fire-Forming
Based on the positive preliminary test results, a 29.5" Bartlein 5R, 8.5" twist, 1.25" straight cylinder contour barrel was chambered with the 6.5-243 Improved reamer and fitted to the trued Remington action and Lowrider stock that is the platform for a very accurate 6mm Dasher rifle. This action has a pinned recoil lug for Holland's, allowing easy field swapping between the 6mm and 6.5mm chamberings.
Due to the lack of availability of 260 Rem brass from Remington at the time of this second set of tests, the decision was made to use neck-expanded Lapua .243 Winchester brass for barrel break-in and long-range load work-up. It was felt that the high quality and intrinsic consistency of the Lapua brass would contribute to a superior long range load.
Brass preparation was identical to the process used on the original Remington brass, with the addition of a neck expansion step prior to the neck sizing and deburring processes. A 6.5mm expander mandrel from K&M, aided by a small amount of Imperial Die Wax, was used to bring the necks up to the proper inside diameter.
Fire-forming of the .243 Lapua brass was again accomplished using jammed 142 Sierra MatchKing moly bullets, over 47.4 grains Ramshot Hunter, and a Federal 215M primer. Accuracy was excellent, with less than 0.5" five shot groups at 100 yards the norm. As with the Remington brass, no split necks or burst shoulders were observed. The case water capacity of the fire-formed Lapua brass was a bit less than the Remington, at 55.9 grains. This is no doubt due to the heavier construction of the Lapua brass.
After fire-forming, the Lapua brass showed a pronounced internal restriction at the neck shoulder junction, thick enough that a bullet would not pass. This restriction was measured to be 0.005" smaller than the fired neck inside diameter using a Starrett hole gauge.
Inside Neck Reaming--Results
The formation of these doughnuts is, unfortunately, a common occurrence with some cartridges. Many manufacturers, including Sinclair and Forster, make a special reamer specifically designed to remove the doughnut from the insides of the neck.
Although Forster designed these reamers to be used with their neck trimming tool, I decided to try using the reamer by holding it in the chuck of a small lathe, set to spin at about 200 RPM. The Lapua cases were held by hand, and carefully fed onto the rotating reamer. The as-fired cases were not resized prior to this operation, as the reamer was sized to fit perfectly into a fired case neck.
While the results look promising under a laboratory grade stereo microscope, there was some concern that excessive material may have been removed from the neck walls higher up than the doughnut, causing undesired wall thickness variations. It was decide to leave these cases for further evaluation at a later time, and concentrate on preparing a newly acquired lot of Remington 260 brass for fire-forming and load development.
260 Remington Brass Preparation--Preparing for Fire-Forming
Remington 260 brass again became available shortly after the Lapua doughnut issue was resolved. Since the Remington brass was simple to prepare for fire-forming, showed good results in the initial tests, and the Lapua brass was suspect after the inside neck reaming, the decision was made to proceed with the project using a lot of 500 Remington cases.
 The new Remington-made 260 brass was prepared using the same process described previously, with primer pocket uniforming, flash hole de-burring, neck sizing with a Lee Collet Die, inside neck chamfering with a VLD tool, and outside neck chamfering. The new Remington-made 260 brass was prepared using the same process described previously, with primer pocket uniforming, flash hole de-burring, neck sizing with a Lee Collet Die, inside neck chamfering with a VLD tool, and outside neck chamfering.
Again, the neck wall thickness of every case was checked, and any case showing more than 0.0015" maximum variation was set aside. Only about 15 cases out of 500 failed this test, with the vast majority under 0.001". In all, the Remington brass was very consistent, with very few burrs in the flash holes, and most primer pockets had little or no material removed during uniforming.
As before, the wall thickness variation measurements were made using a shop made test fixture shown below, but other vendors, like Sinclair International, sell a similar instrument.
| Alternate 'No-Bullet' Fire-Forming Using Inert Filler |
Notice: This method is can be very dangerous! Even without a bullet, very high pressure gasses and debris are ejected with violence, and can cause significant damage or injury. Blasting of large holes in walls and ceilings from discharging this type of load indoors have been reported. Only perform this process in a safe place and manner, and follow all firearm safety procedure at all times.
Others have documented successful fire-forming of Ackleyized cases using light loads of pistol powder which drives an inert filler material into the case shoulder hard enough to fully expand the brass into the desired shape. There are multiple advantages to using this technique. First, the cost is low since no bullet is required. Second, there should be must less barrel wear, as you are only running a soft filler and some high pressure gas through the bore.
 After searching the web, very little concrete documentation relating to the actual details of the process was found, so I decided to put some effort into developing a safe and effective process. Based on what little info was available, I selected Unique pistol powder, a Winchester Large Rifle primer, regular (not instant) Cream of Wheat breakfast cereal as the inert filler material, and a dab of Crisco shortening at the top of the case mouth to hold it all in during the firing process. After searching the web, very little concrete documentation relating to the actual details of the process was found, so I decided to put some effort into developing a safe and effective process. Based on what little info was available, I selected Unique pistol powder, a Winchester Large Rifle primer, regular (not instant) Cream of Wheat breakfast cereal as the inert filler material, and a dab of Crisco shortening at the top of the case mouth to hold it all in during the firing process.
The initial load was 9 grains of Unique, with the case filled to within 0.125" of the top of the neck with Cream of Wheat. A small amount of Crisco was then placed on top and smoothed with a finger to seal it in. A 10cc syringe was packed with shortening and used like a cake decorating tool to apply the grease evenly and neatly.
Not knowing what to expect in terms of noise and blast force, the initial test was done at the range following standard range safety procedures. The report was quite loud, about like a starter pistol or a 22LR. However, other than a jet of gas and vaporized cereal, there was little recoil, and no projectile was observed to be ejected. Even so, this was a very violent event, demanding safety precautions.
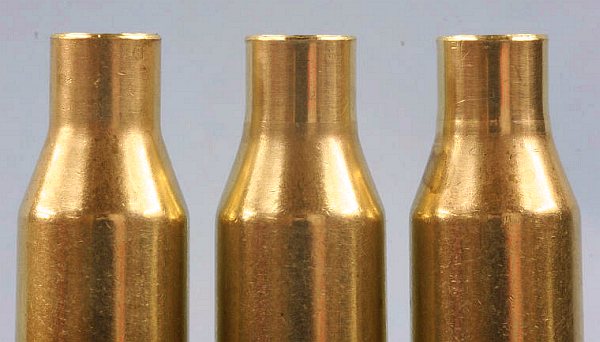
 The starting load of 9 grains Unique did start to form the Ackley shoulders, but there was obvious incomplete expansion into the very corners of the new chamber. When the charge was gradually increased to 15 grains, nice sharp shoulders were consistently formed. The picture shows, from left to right, an unfired 260 Remington case, a case fire-formed with 9 grains Unique, and a case fire-formed with 15 grains Unique. The starting load of 9 grains Unique did start to form the Ackley shoulders, but there was obvious incomplete expansion into the very corners of the new chamber. When the charge was gradually increased to 15 grains, nice sharp shoulders were consistently formed. The picture shows, from left to right, an unfired 260 Remington case, a case fire-formed with 9 grains Unique, and a case fire-formed with 15 grains Unique.
During the first 30 trial shots, about 5 misfires were observed, along with a number of fired cases having a significant amount of filler left inside. This remaining filler caused a mess by spilling all over the inside of the action, requiring a cleaning by blowing out the action and chamber with compressed air. In addition, the chamber (and the operator's hands) would get a bit greasy from the Crisco, also requiring a bit of cleaning with a solvent patch and a rag. Brake cleaner worked great in cleaning the bore after a few rounds. The misfires were attributed to the forcing of the case forward by the firing pin strike, enough that erratic or no ignition would sometimes occur. The 260 Remington brass did not have enough mechanical strength to resist the firing pin blow, even with the standard Ackley 0.004" crush headspace setting. The results, while promising, required another trip back to the drawing board to resolve the final misfiring issues.
Solving the Loose Case Misfire Problem--The False Shoulder Method
One of the most common methods to fire-form 6mmBR brass into 6mm Dasher cases (6mmBR Ackley improved) is to introduce a false shoulder into the case neck, just thick enough and long enough to firmly hold the case in place in the chamber during the firing pin strike. In the case of the Dasher process, this is done by expanding the 6mm neck with a 25 caliber or 6.5mm mandrel, then neck sizing with a bushing die, setting the bushing such that only a part of the neck is resized. The position of the bushing is adjusted until a firm force is needed to close the bolt on a prepared case. This locks the case in place, and assures good ignition and consistent case lengths after fire-forming.
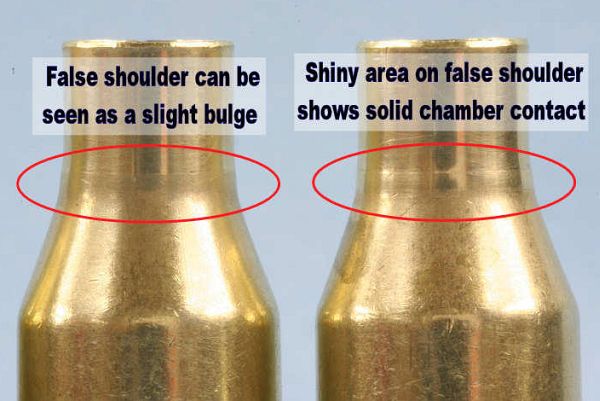
For this experiment a 7mm mandrel was used to expand the neck. The neck was then sized down using a Redding Type 'S' bushing neck die with a 0.292 bushing. The bushing length was set so that a very firm push was required to chamber an empty case with this false shoulder. The picture shows (left to right) an un-modified case on the left, an unchambered case with a false shoulder formed (middle), and a false-shouldered case that has been chambered and extracted (right). The close-up photo clearly shows the region of the case that has been forced into the neck part of the chamber as a shiny ring at the base of the neck. This crush firmly locks the case into place during firing.
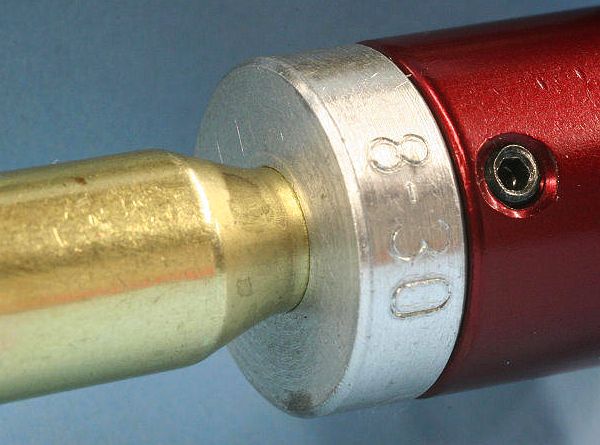
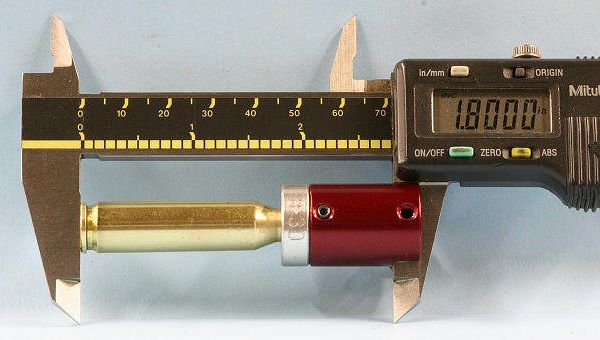
To illustrate the technique used to measure the position of the false shoulder during this trial and error process of adjusting the bushing, the following pictures show the use of a Stony Point 30-caliber bullet comparator as a nifty length gauge.
The close up clearly shows how the comparator rides over the 6.5mm case neck, and comes to bear on the false shoulder. For the test rifle chamber, a length of 1.800" provided the perfect amount of crush.
Once the cases were prepared with this false shoulder, there were no more misfires, and only three cases out of 100 fired had any filler remaining inside. This was a clear indicator that the weak firing pin strike due to case movement resulted in erratic and incomplete ignition, as well as the misfires. This poor ignition was also the source of the incompletely ejected filler. No barrel wear was observed through a Hawkeye bore scope after cleaning with solvent and patches. All 100 cases measured within ± 0.001" in OAL after fire-forming, and likewise all 100 had very sharp shoulders.
CONCLUSIONS
Once the problems with case movement and erratic ignition were worked out, this projectile-less method proved to be very effective, and appears to offer a significant savings in both cost of components and barrel wear during fire-forming.
All content Copyright © 2007 Chris Long and AccurateShooter.com, All Rights Reserved.
No reproduction without advanced permission in writing.

|
|

